Easy Miracles: Movies from Still
Pictures
© 2000 Lawrence I. Charters
Washington Apple Pi Journal, July/August 2000,
pp. 35-39, reprint
information
Note: all of the
images necessary to re-create this project, plus the finish
clips themselves, are available on the Pi's Web site. The
original photos are located at:
http://www.wap.org/journal/easymiracles/easymiraclesphotos.html
and various forms of the finished QuickTime movie clips
are located at:
http://www.wap.org/journal/easymiracles/easymiraclesmovies.html
Feel free to grab the images and clips and experiment.
Note, however, that some of the clips are fairly large.
Note, too, that you'll need QuickTime
Pro to get very far.
How Easy?
Using nothing more than a Power Macintosh and Apple's
QuickTime Pro 4.0, you can make movies. You don't need any
other software at all. No movie making software, no movie
editing software. Nothing else is required. But before we
get to that, let's see why you'd want to do this.
Why Should I Care?
When I bought my first computer, all I wanted was a
"magic typewriter." I wanted a machine that would allow me
to type as fast as possible, without worrying about putting
the paper in straight, or having the paper fall out at the
bottom of a page, or wondering how to correct mistakes
without retyping. (Hint: the key to a good vocabulary is
learning how to turn a typo into a word that you
really wanted.) My first computer, a Radio Shack
TRS-80 Model I, did all that.
By the time I got my first Macintosh, my wants changed: I
wanted to draw. A young girl named Emily demonstrated a
Macintosh on the top floor of the U.S. Marine Barracks in
Yokosuka, Japan, in February 1984. Her father had purchased
the machine in Hong Kong a few days earlier and Emily, with
only an hour's experience with the machine, was drawing
black-and-white pictures of a house, a hill, and the sun,
with sheep and cats and dogs and frogs and other things
sprinkled liberally over everything. I decided I wanted to
draw, too, and the Mac turned me into a (mediocre) artist.
I never really wanted to make movies, on a computer or
through other means. Making movies requires a camera, film,
time and talent. I had none of those ingredients. But then
came QuickTime Pro 4.0. I discovered you don't need a
camera, or film, or even much talent, and very little time.
But you do need a Macintosh and QuickTime Pro.
Requirements
First off, make sure you have a Power Macintosh. Any
currently shipping model will do, or any Power Macintosh
dating back to the very first models. Apple says that
QuickTime Pro 4.0 requires a minimum of 16 megabytes of RAM
but (ha-ha!) this is more theoretical than practical. If you
have a Power Mac and you have less than 64 megabytes
of RAM, you are shortchanging yourself and your computer.
Naturally, things work more quickly and elegantly if you
have a machine with a G3 or G4 processor.
While QuickTime 4 works on Centris and Quadra Macs,
QuickTime Pro requires a PowerPC-based machine. And money:
$29.99. You turn an "ordinary" version of QuickTime 4 into
QuickTime Pro by pointing a Web browser to:
http://www.apple.com/quicktime/upgrade/
and filling in various blanks on a form, particularly
your E-mail address (so Apple can E-mail you a registration
code) and your credit card number. If you live or
work in Cuba, Iran, Iraq, Libya, North Korea, Sudan, Syria,
or other places (please check the U.S. State Department for
an updated list), you aren't supposed to have access to
QuickTime Pro, so find something else to do. Growing food
would be a good choice.
Once you have these pieces (and assuming you have
electricity to run the Power Mac), you're all set. No
camera, film, special cables or chemicals are required to
make movies.
Step By Step
Making movies without a camera may seem difficult, but it
comes from QuickTime Pro's ability to turn any sequence of
images into a QuickTime clip. "Sequence of images" sounds
like it could be tricky, but it isn't: QuickTime Pro will
accept a wide variety of computer image formats, ranging
from screen shots to high-resolution TIFF images. Let's
start with something simple: screen shots.
|
|
|
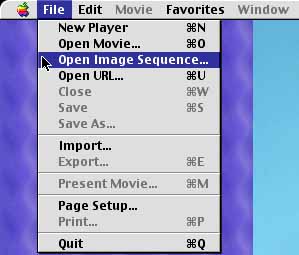
From within QuickTime Player, go to the File
menu and select Open Image Sequence. If your
QuickTime Player doesn't offer this option, you
need to upgrade from the "regular" QuickTime to
QuickTime Pro.
|
To take a screen shot, press the CMD-Shift-3 keys at the
same time. [The CMD -- Command -- key has an Apple and
cloverleaf symbol.] You'll hear the sound of a camera
shutter, which is a nice touch. If you look on your hard
drive, you'll see a brand-new document titled Picture 1.
Press these keys again, and you'll create Picture 2, Picture
3, etc. These three keys will "take a picture" of your
entire screen, but if you press CMD-Shift-4, you can select
which part of the screen you want saved as a picture file.
CMD-Shift-4-CAPSLOCK will take a picture of the current
active window, and only that window.
Note that, while it is not a requirement, it is a Very
Good Idea to make sure that all the images have the same
dimensions and orientation. If the images don't have the
same dimensions, all images will be stretched, or
compressed, to match the dimensions of the first image
imported. If the images don't have the same orientation
(landscape or portrait), everything will work just fine, but
look silly. Of course, you may want to deliberately change
the orientation of a picture to make it seem as if it is
rotating, but that's a different issue.
One thing that is a requirement: all the images must have
a common name. While you can mix file formats (GIF, JPEG,
MacPaint, PICT, BMP), the images should all have the same
common name, with just the number at the end differing. And
yes, if you number the images backwards (Picture59 is
renumbered Picture1, Picture58 is renumbered Picture2), the
images will be imported backward.
|
|
|
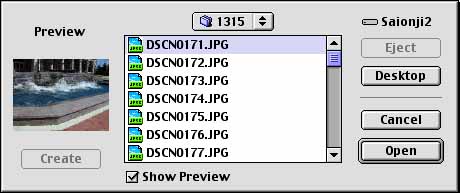
From the Open Image Sequence window, select the
first image you want for your movie, and the rest
of the images will be imported as well.
|
Once you have your images collected, properly sized and
oriented, and properly named, place them all in a folder.
Then launch QuickTime Player, go to the File Menu, and
select Open Image Sequence. Within the dialog box, open the
folder containing your images, select the first image in the
sequence, and press the Open Button.
|
|
|
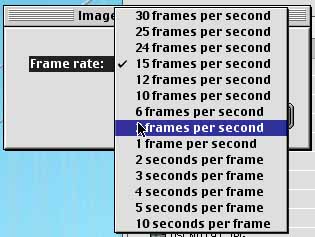
One of the first choices you'll have is: what
frame rate do you want to use for your clip? Since
the original still images were taken at half-second
intervals, "2 frames per second" was selected.
|
A box will pop up called Image Sequence Settings, and
offering a variety of frame rates. "Frame rate" is taken
from the motion picture industry; you are being asked how
many images should be displayed per second in your finished
movie. The options range from 30 frames per second
(professional movie quality) to 10 seconds per frame
(appropriate for a "movie" consisting, say, of nothing but
screen shots, or material requiring a lot of reading). After
making your selection, your Mac will (quickly) grab all the
images you've selected and assemble a QuickTime clip. You
can then play the clip and, if you like it, save it to your
hard drive. If you don't like the clip -- say, you'd like
the frames to play faster or slower -- you can close this
clip and re-import your images at a different frame rate.
|
|
|
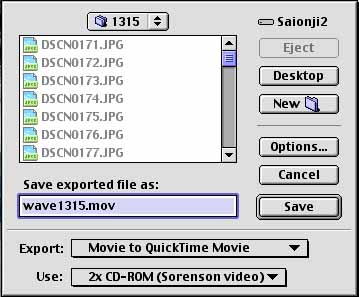
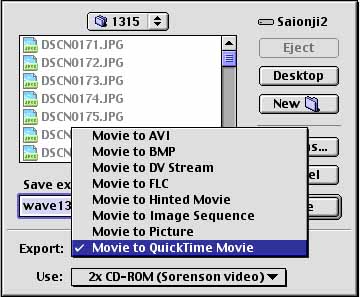
Saving your new movie is just as easy: from the
File menu, select Export Movie. After giving the
movie a file name you can simply press the Save
button, or you can experiment with the various
options presented by the Options button and the
Export and Use pop-up menus.
|
Inspiration
It is one thing to know, in a vague sort of way, that
QuickTime can import still images and turn them into motion
pictures. It is quite another to actually try it. Usually,
you need some sort of inspiration, and mine came in the form
of a Nikon CoolPix 950 camera.
As reviewed by John
Barnes in a recent Journal article, the CoolPix 950 is a
third- or fourth-generation digital still camera that
produces exceptionally sharp still images, which it saves as
JPEG-compressed files that can be transferred to a computer
via serial cable. But it also has one other feature that
John didn't emphasize: it can take pictures at the rate of
two per second, much faster than most film or digital
cameras. It also numbers these images sequentially.
Armed with this knowledge and a borrowed camera, I
visited the Wave Pool Park in Silver Spring, MD. Wave Pool
Park features a "sculpture" that, through the use of clever
mechanical equipment housed underground, can reproduce
something like forty different kinds of waves. The waves
crash against a stone wall that was allegedly inspired by
the Maine coastline. The result is spectacular: you can sit
on a bench in the middle of a metropolitan center (just a
few hundred feet from the Silver Spring subway station),
dozens of miles from the nearest beach, and watch (and
listen) to crashing waves.
|
|
|
While most people will probably want to save
their clip as a QuickTime movie, other options
exist. In particular, note that you can export
clips as a DV Stream, for use with FinalCut Pro and
iMovie.
|
In just a few minutes, I filled the camera's CompactFlash
memory card with pictures
of the Wave Pool in action. After transferring these to
my Macintosh, I made movies.
Slow-Scan TV
The Wave Pool turned out to be an almost ideal subject:
it was a "moving" subject, but it didn't go anywhere. With
the CoolPix taking pictures at the rate of two per second,
the waves "jump" between frames, but still look reasonably
natural. The overall effect was similar to slow-scan TV,
most commonly seen in security surveillance systems.
One group of 34 photos looked particularly promising, so
they were all placed in a folder and sucked up into
QuickTime Player. As the photos were taken at two frames per
second, the frame rate was set at two frames per second,
too. The resulting clip was outstanding, but also very large
4.6 megabytes), since the original images were
medium-resolution 640 by 480 pixel photos.
|

|
|
If your source material consists of fairly large
images (in this case, 640 by 480 pixel photos),
selecting Half Size from the Movie menu will put
the entire clip on a diet. Not only do larger clips
take longer to download (and take up more room on
your hard drive), but they also tend to "break up"
when seen on older or slower computers.
|
Selecting Half Size from the Movie Menu, and saving the
clip again, greatly reduced the overall size, from. This
worked so well that other options were tried, such as saving
the clip using different compression schemes, and seeing the
effect on file size of various streaming (video over the
Internet) options.
|
|
|
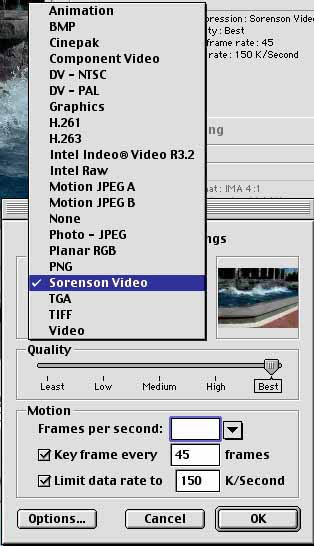
Buried as an option under the Options button are
a number of choices for compression, ranging from a
sliding bar for image quality to a choice of frames
per second to a throttle on the data rate (useful,
in particular, if you want your clip to play on
older, slower machines). A variety of compression
schemes are also available; experimenting with all
these options will easily occupy an afternoon, even
for short clips.
|
Oops
Pleased with this success, I then tried another sequence
of images. While the first set of photos were taken in
landscape orientation, the second sequence was taken in
portrait orientation. When these photos were sucked into
QuickTime, I ended up with a very nice little clip -- but
rotated 90 degrees. If you were living in Brazil, a quarter
way around the world, it probably would have looked fine.
|
|
|
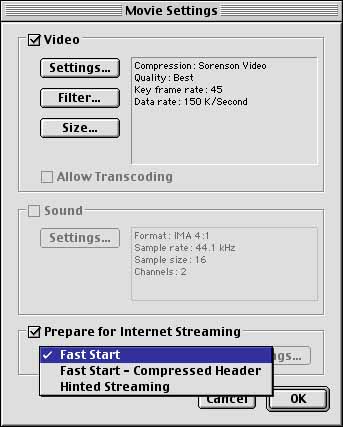
The Options button allows you to set up your
movie clip for streaming across the Internet. If
you don't have a true QuickTime Streaming server,
Hinted Streaming won't do you any good, but the
Fast Start and Fast Start-Compressed Header options
allow your clip to start playing while it is still
being downloaded.
|
Inspired by this mistake, I then tried importing the same
images, but at too high a frame rate. This resulted in a
nice clip, still rotated 90 degrees, of waves banging back
and forth at high speed. I think of it as the "Wave
Pool seen from Brazil, after too much coffee."
Documentation? What Documentation?
Some time later, I learned that it is easy -- very easy
-- to correct the orientation of my "Brazil" clips. I might
have stumbled on the secret myself, but instead I stumbled
on something else: documentation for QuickTime Pro.
|
|
|
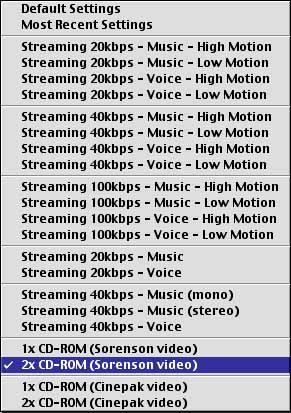
One of the last things you should do as you
export your movie to disk is: select a streaming
option. If you are saving a clip for use on the
Web, there are lots of options for high-speed,
medium, and low-speed connections, "tweaked" for
different material, such as music or voice, mono or
stereo. There are also several options for saving
clips for use on CD-ROM. The most "compatible"
option would be "1X CD-ROM (Cinepak video)", since
this would allow the clip to be played on older,
slower CD-ROM drives using older versions of
QuickTime. "Streaming 40kbps - Music (stereo)", in
contrast, would produce a clip optimized for
computers with stereo sound and high-speed Internet
connections.
|
Apple provides no documentation at all: they'll let you
upgrade to QuickTime Pro for $29.99, but this price doesn't
include any additional clues on how to use the software. But
Judith Stern and Robert Lettieri have stepped into the gap
with their excellent Visual Quickstart Guide: QuickTime
Pro 4. Very well written and with an excellent index, I
learned all kinds of new tricks, such as --
Come to think of it, these new tricks would best be
covered in another installment. In the meantime, go out and
get the Visual Quickstart Guide: QuickTime Pro, and upgrade
your copy of QuickTime to QuickTime Pro 4. (And if you don't
have a Power Macintosh, pick up an iMac, or iBook, or
PowerBook, or Power Mac G4).
Resources
Judith Stern and Robert Lettieri, Visual Quickstart
Guide: QuickTime Pro 4. Peachpit Press, 1999. xxiv, 359
pp. $17.99. ISBN 0-201-35469-1
http://www.peachpit.com
QuickTime Pro 4
http://www.apple.com/quicktime/upgrade/
|

