

This article is another in the series about simple programming in REALbasic (RB) to construct a check register. What began as a demonstration to build a simple check register has been transformed into a more full-featured application as a result of the addition of features as the series has developed. The application through Part 6 can be downloaded here:
http://www.wap.org/journal/realbasic/
This article will demonstrate the addition of Automatic Deposit.
Many people receive an automatic electronic deposit from their employer, the Social Security Administration or some other source. I will show you how to add the capability to track an automatic deposit, so that it is always recorded in your check register.
First I click on the Add Window icon and then, in the Property/Value table, I establish the following parameters for the new window:
Name: autoDeposit
Width: 700
Height: 375
Frame: 1-Movable Modal
Title: Automatic Deposit
To the new autoDeposit window I add a new control, the TabPanel, and assign the following parameters:
Width: 660
Height: 335
In the Appearance section of the Property/Value table I click on the ellipsis of the Panels and define the TabPanel as having two tabs. I title them:
Establish Auto Deposit (Tab 0)
Auto Deposit Status (Tab 1)
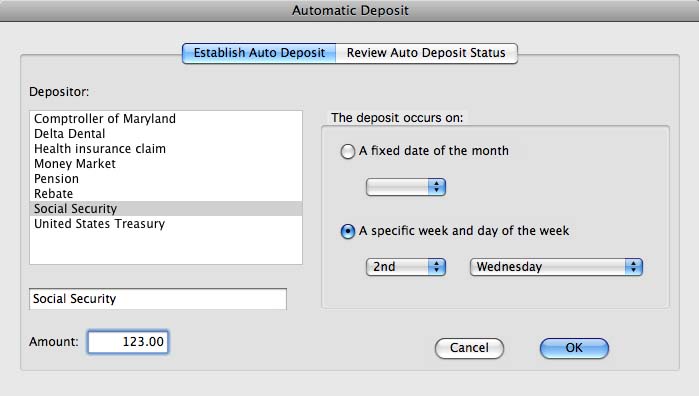
Figure 1. Here is Tab 0 of the new window I have created so my checkbook register will automatically record my paltry social security check every month.
I configure Tab 0 of the autoDeposit window as shown in Figure 1 with a list box, a couple of edit fields and a group box with some popup menus. The only new control is the popup menu, which I'll cover in a moment. Tab 1 is configured as shown in Figure 2.
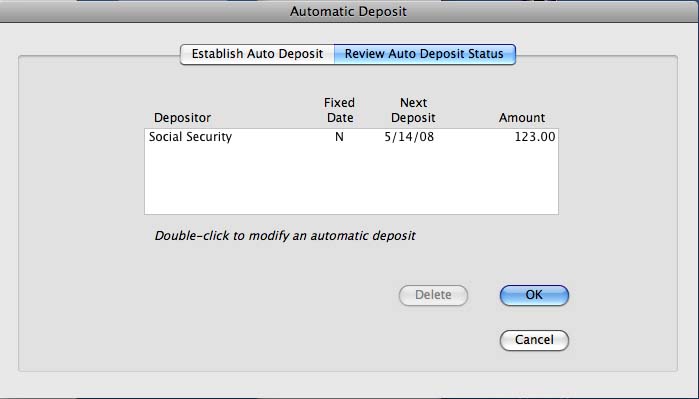
Figure 2. Tab 1 of the autoDeposit window lets me review the status of that social security check deposit.
I need a few new variables for my autoDeposit window. In the globalFinancial module I'll define nAutoDeposits as an integer, autoDepList(0) as a string array and autoDepositFlag as a boolean. In the autoDeposit window I'll define autoDepositChangeFlag and fixedDate as boolean. I'll define autoDepositIndex, listSelection and rowSel as integers.
In order to call the new autoDeposit window, I've added a menu item (Automatic Deposit...) to the Special menu just below the Reconcile menu item added in the Part 4 article. Its menu handler reads simply:
autoDeposit.init
This new method, init, configures the window:
loadDepositorsList

    loadReviewList

    setInitialValues

    self.show
The loadDepositorsList method loads the list box in Tab 0 with the same list of depositors that is loaded in DepositWindow. In order to make this operate properly, the variable nDepositors is moved from DepositWindow to globalFinancial.
dim i as integer
for i = 1 to ndepositors

  depositorsList.addrow depList(i)

    next

    depositorsList.headingindex = 0

  depositorsList.sort
The loadReviewList method loads the list of established automatic deposits (if any) into the list box (AutoDepReview) in Tab 1. This list will come from automatic deposit information that will be read from the Preferences file (that I will cover later):
dim i As integer
AutoDepReview.DeleteAllRows

    for i = 1 to nAutoDeposits

  addAutoDepReviewRow(autoDepList(i), i - 1)

    next
The setInitialValues method initializes the radio buttons, edit fields and popup menus:
depositorsList.index = 0

  rcvdFm.text = ""

  autoAmt.text = ""

  dateButton.value = true  // fixed date radio button

  datemenu.listindex = 0  // fixed date

  daymenu.listindex = 0  // day of week

  seqMenu.listindex = 0  // week of month

  fixedDate = true  // boolean
tabPanel1.value = 0 // tab 0 active
I haven't yet defined what will appear on each of the popup menus, but RB makes it easy. Each popup menu Property/Value table has an InitialValue item. Clicking on its ellipsis reveals a window where the menu labels are entered. Figure 3 shows the InitialValue window for the seqMenu (week of the month). Similarly, the popup menu under the Fixed Date button will list the days 1 through 31 and the day-of-week popup menu will list Monday through Friday.
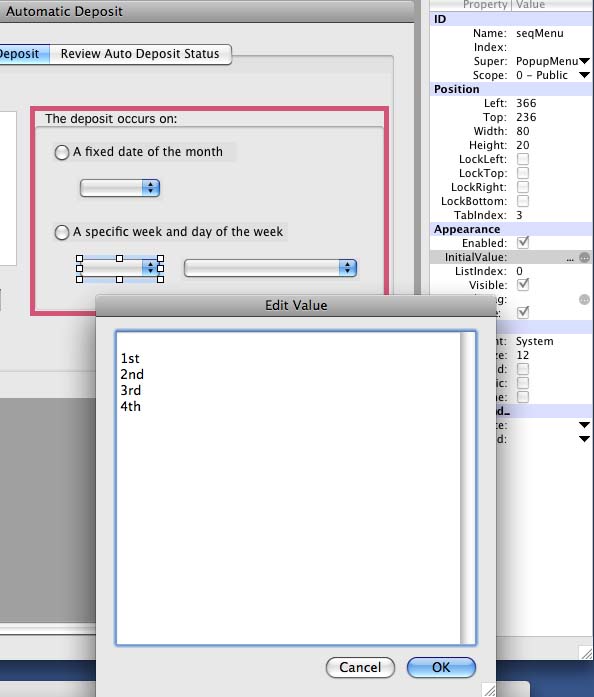
Figure 3. When I set up my automatic deposit I use this pop-up menu to fill in the information the program needs to schedule the deposit.
When the user has entered the data in Tab 0 and clicked on the OK button, its action handler contains the following method:
dim i As integer
if rcvdFm.text = "" then

  msgBox "You must select the Depositor."

  return

    end if

    if autoAmt.text = "" then

  msgBox "You must indicate the amount of the automatic deposit."

  return

    end if

    if dateButton.value and dateMenu.listindex = 0 then

  msgBox "You must select a date for the automatic deposit."

  return

    end if

    if dayButton.value then

  if seqMenu.listindex = 0 or dayMenu.listindex = 0 then

    msgBox "You must select the day for the automatic deposit."

      return

  end if

    end if
if autoDepositChangeFlag then  //modifying existing auto dep

  i = autoDepositIndex

else   //new automatic deposit

  nAutoDeposits = nAutoDeposits + 1

  i = nAutoDeposits - 1

  autoDepReview.addRow ""

    end
autoDepReview.cell(i, 0) = rcvdFm.text

  autoDepReview.cell(i, 3) = Format(StrToVal(autoamt.text), "###,###.00")
if fixedDate = true then

  autoDepReview.cell(i, 1) = "Y"

  autoDepReview.cell(i, 2) = findAutodate(0, datemenu.listindex)

  autoDepReview.cell(i, 4) = "0"

  autoDepReview.cell(i, 5) = str(datemenu.listindex)

    else

  autoDepReview.cell(i, 1) = "N"

  autoDepReview.cell(i, 2) = findAutodate(seqMenu.listIndex

    daymenu.listindex + 1)

  autoDepReview.cell(i, 4) = str(seqMenu.listindex)

  autoDepReview.cell(i, 5) = str(daymenu.listindex + 1)

    end if
depositorsList.selected(rowSel) = false

  setInitialValues  // reset panel 0

    tabPanel1.value = 1

    autoDepositChangeFlag = false
This is a very long method but it's not too complex. The first series of if-statements merely checks for errors. Then the data are loaded into the Tab 1 list box (autoDepReview), the Tab 0 controls are reset and Tab 1 is displayed (Figure 2). The only new thing is the call to a method called findAutoDate. This method decodes the date or day of week selections into a real date. Below I describe how to set this up.
This method receives the list indices from the popup menus in Tab 0. It converts them into a date that is returned to the calling method. This will be the date that will trigger the next automatic deposit. The findAutoDate method below is placed in globalFinancial because it will be called by other than the autoDeposit window:
// receives i as integer, j as integer

 // determine deposit date from week number and day of week OR

// from simple date

// i is week of month, j is day of week

// i = 0 means a simple date input and j = date of month
dim s as string

    dim d, today as date
today = new date

    d = new date

  d.day = 1
if i = 0 then // simple date input

  d.day = d.day + j - 1

  if today.totalSeconds >= d.totalSeconds then

    d = addMonth(d)

  end if

    else

  d.day = d.day + dayToDate(d, i, j) - 1

  if today.totalSeconds >= d.totalSeconds then //should be next month

    d.day = 1

    d = addMonth(d)

    d.day = d.day + dayToDate(d, i, j) - 1

  end if

    end if
s = d.shortdate

    return s
To begin, two new dates are defined (d and today) and by virtue of them being new, they are set to the current date–the date the method is run. The date d is then set to the 1st day of the current month.
If i equals 0, I make d.day equal to j (the list index of the dateMenu popup). Then I test to see whether today's date is greater than d.day. If not, then d will be the next trigger date. Otherwise, I add a month to d using the method addMonth.
The other case occurs when a specific week and day-of-week is selected.
There are two embedded methods in findAutoDate: addMonth and dayToDate.
This method adds a month to the date that is sent:
// receives d as date
if d.month <> 12 then

  d.month = d.month + 1

    else

  d.year = d.year + 1

  d.month = 1

    end if

    return d
This is a simple process unless the month is 12 (December), in which case the month is reset to 1 and one is added to the year.
This method receives a date, an integer representing the week number and an integer representing the day of the week. Sunday is 1. The method returns the date of the month.
// receives d as date, i as integer, j as integer

    // i = week, j = desired day-of-week

    // d has been set to first day of month

    // returns day of d.month

    // that satisfies i & j input
dim nWeeks, nDays, offset as integer
nWeeks = 7 * (i - 1)
offset = j - d.DayOfWeek
if offset > 0 Then // j is later than d.DayOfWeek

  nDays = nWeeks + offset + 1

    Else

  nDays = nWeeks + (8 - d.DayOfWeek + j)

    End
Return nDays // date of month
This is simply an algorithm that converts a week and day-of-week into a date. It first looks at the relationship between the desired day-of-week and the day-of-week of the first day of the supplied month. That determines offset. Offset is then tested and whether it is positive or negative determines the way the final day of the month is calculated.
If all is well and the user clicks on the Tab 1 OK button, its action event handler executes:
rebuildAutoDepList

    autoDepositFlag = true

    prefsHaveChanged = true

    self.close
The rebuildAutoDepList method reloads the string array autoDepList(0) in globalFinancial. This array will be used later when I write the automatic deposit data out to the Preferences file.
dim i As integer

    dim amt As Double

    dim s As string
redim autoDepList(0)

    for i = 1 to nAutoDeposits

  s = autoDepReview.cell(i - 1, 0) + chr(9)  // Depositor

  amt = StrToVal(autoDepReview.cell(i - 1, 3))

  s = s + str(amt) + chr(9)  // Amount

  s = s + autoDepReview.cell(i - 1, 1) + chr(9)  // Fixed Date?

  s = s + autoDepReview.cell(i - 1, 4) + chr(9)  // Week

  s = s + autoDepReview.cell(i - 1, 5) + chr(9)  // Day

  s = s + autoDepReview.cell(i - 1, 2)   // Next Date

  autoDepList.append s

    Next
This method first zeros the autoDepList array and then reloads it with data from the list box in Tab 1.
Then, the following is added to the writePrefs method described in Part 5 so that the automatic deposit data is saved:
// autoDeposit status

  o.writeLine "Number of AutoDeposits" + chr(9) + str(nautoDeposits)

    for i = 1 to nAutoDeposits

  o.writeline autoDepList(i)

next
This method first writes the number of automatic deposits contained in autoDepList and then writes each line of the autoDepList array into the preference file.
The autoDepositFlag will indicate the presence of an automatic deposit when the application is first opened and it will be set by this new code that is added to the existing readPrefs method described previously:
// get autoDeposit data

    s = instream.readLine

    nAutoDeposits = val(NthField(s, chr(9), 2))

    if nAutoDeposits > 0 then

   autoDepositFlag = true

   for i = 1 to nAutoDeposits

     autoDepList.append instream.readLine

   next

End
The last thing to do is to test the automatic deposit information when the application opens to see if one of the automatic deposit trigger dates has passed and if so, make the appropriate entry in the check register. The following lines of code are placed in the readDataFile method after all of the data records have been read.
// check for automatic deposit

    if autoDepositFlag then

  autoDepCheck

End
This code simply calls the autoDepCheck method if the autoDeposit flag has been set true by the previous code in readPrefs. The autoDepCheck method:
dim t, s As string

    dim i, j, k As integer

    dim d As new date
for i = 1 to nAutoDeposits

  t = NthField(autoDeplist(i), chr(9), 6)  // Trigger date

  if DateSeconds(t) <= d.totalseconds then

    // update Check Register window

    s = t + chr(9) + chr(9) + chr(9)

    s = s + NthField(autoDepList(i), chr(9), 1) + chr(9) + chr(9)

    s = s + NthField(autoDeplist(i), chr(9), 2)  // Amount

    addTransRow(s, ntransactions)

    ntransactions = ntransactions + 1

    msgBox "Automatic Deposit made for " + NthField(autoDeplist(i),
  chr(9), 1)

    testEntryDate(ntransactions)  //see if it's an "old" date

    FindBankBalance

    ListHasChanged = True
    //update next trigger date

    j = val( NthField(autoDeplist(i), chr(9), 4))

    k = val( NthField(autoDeplist(i), chr(9), 5))

    autoDepList(i) = Replace(autoDepList(i), t, findAutodate(j,
  k))

  End

    Next
This method looks at the trigger date of each automatic deposit listed in the autoDepList() array. If it is less than today's date, a record is built and then added to the check register using the method, addTransRow which you saw in Part 1. The method also calls testEntryDate that was added in Part 5, to insure that the Check Register is kept in chronological order. Lastly, the next trigger date is computed and added to the autoDepList() to be written out to the Preferences file.
This concludes this article on REALbasic. The final article will add the coding necessary to start using the CheckRegister with your own checking account.
The compiled application to-date along with the data files and the source code can be downloaded here:
http://www.wap.org/journal/realbasic