

Santa dropped by a few days early this year, leaving off a most welcome package: KnockOut 2 (KO), the Photoshop plug-in published by Corel. The purchase price recently was reduced—to just $89—and it looked like a good investment. A note to Corel sales and also to technical support to enquire about compatibility with my Photoshop Elements (PE) went unanswered. The KO gift arrived, and the dilemma became: to open or not to open?
Washington Apple Pi mavens frequenting the Pi forums on the TCS suggested that KO likely is compatible with PE, and so I crossed fingers, broke the seal and fired up the installer. The install process stopped cold at the point where the user gets to "Accept" the fact that the publisher is always right, and the user always wrong, in all matters having to do with use or failure of the product. The "Accept" button was grayed out and stayed that way. WAP-member Rick Zeman suggested that I scroll to the bottom of the license document. This made no sense at all—one would only do such a thing if he actually wanted to read the offending text. But I did it anyway, and the button came to life! After that—a piece of cake. The installation put the plug-in code into the PE Plug-Ins folder as requested, and the PE-KO team became an operational unit.
One big problem that KO addresses is that of composition. If you are an amateur photographer like me, you have no photo studio, no lights on stands, and no movable scenery. You get no financial remuneration, and hence little obedience from your subjects. So you grab what shots you can as things seem to come together, and often as not, you end up with a poor composition. In particular, you often find that the person or object photographed is situated against an imperfect background: the "telephone-pole-coming-out-of-the-head" syndrome.
Undesirable backgrounds often are made especially unsuitable by the fact that they are in sharp focus. Consumer-priced digital cameras have lenses of shorter focal length than that of their 35 mm and larger format counterparts. Depth of field is a property of focal length; long lenses have shallow depth of field, short lenses have deeper fields. Since our typical digital camera has a light sensitive component ("film") that is smaller even than a 35 mm frame, the camera lens must be shorter—so the depth of field is great, and it often becomes impossible to throw the background out of focus.
KO's purpose is to facilitate the isolation of one area of a photograph from another, so that the two can be handled separately and perhaps one can be discarded in favor of a better substitute. There are other tools available to "lasso" a part of a photo in order to deal with it separately, but as we shall see, KO brings increased power and flexibility to this task.
KO is a member of that class of software applications known as plug-ins. That is to say, it does not operate in a freestanding manner, but rather as a helper module working with some host application. The Corel literature states that KO works with Adobe Photoshop, Corel PHOTO-PAINT, and Corel Painter. I'm happy to report that we now can add Adobe Photoshop Elements 2.0 (PE) to that list.
KO permits the user to define three areas of an image: foreground, background, and transition. It is this recognition and support of a transition area that sets KO apart from other programs and the more common selection methodologies. Within the user-defined foreground, all pixels are of course designated as belonging to the foreground. And within the user-defined background, all likewise are treated as belonging to the background. But within the transition area, each pixel is examined and categorized by KO as belonging to foreground or to background according to its color. It is this analysis and categorization that I believe is unique to KO.
The distribution package includes one CD-ROM, a card with installation instructions, another card bearing the software license key, and a thin but well organized manual. The manual provides quite complete, if rather cryptic coverage of KO functionality.
The installation process for KO is the best kind—uneventful. Just launch the installer, remember to scroll to the bottom of that license prose, select the location for installation according to guidelines of the host application, and let it run. After installation, KO is invoked by selecting the appropriate menu item from the host application. In the case of PE, this is the Filters menu in which a KnockOut entry now appears.
The installation creates a new KnockOut folder within the Plug-Ins folder. This contains the plug-in itself along with a score of sample images and a few tutorials. A complete list of components installed and their locations is logged in the /Library/Receipts folder.
The user that is knowledgeable and experienced with Photoshop, or with whatever other host application is paired with KO, is unlikely to need much support. And that would seem to be a good thing. Corel did not respond to e-mail sent from elsewhere other than from within its web site—and was not very quick to answer one that was. I received a response to one simple question about ten days after submission.
In order to perform the KO function, the user duplicates the entire subject image in a new PE layer, and in that layer the foreground, background, and transition areas are user-defined by means of the KO-provided tools. This definition is accomplished by drawing two more-or-less parallel lines around the foreground object. One of these lines will be just within the foreground, and the other will be just outside it. What is outside the outer line is background area; inside the inner line is foreground area; between the two lines is the transition area. The plug-in provides two pair of tools for this: inside and outside pencils, one for the foreground object and the other for its shadow, if any. After the three areas are established the "knock out" function is executed, and this removes all background pixels, leaving only the foreground object. When this layer is then loaded back to PE, both it and the underlying background layer may be separately manipulated. Using the PE tool suite, one may be emphasized, and the other de-emphasized. Alternatively, the new layer with isolated foreground may be moved to yet another PE image file containing a different background altogether.
The KO tool suite includes two powerful tools for rectifying any misidentification of pixels lying within the transition area. One of these is a "brush" which can be used to restore pixels that should not have been removed; the other is an "eraser" that will remove pixels that should have been taken out but were not. These tools may be used one after the other, over and over, until the user is satisfied or exhausted.
The following steps were taken in order to create three sample images that illustrate the KO functionality:
First off, I cast about in my stock of photos to find one that would be an appropriate demo subject, i.e., having an unfortunate background. (This search proved not at all difficult.) The selected photo is hopelessly afflicted by a busy, distracting background that includes brightly colored objects inconsequential to the scene. The subject is lighted by direct, on-camera flash; something to be avoided where possible, and the flash is overpowered by bright sunlight streaming through a window directly behind the subject. This lighting results in an underexposed subject with some washed out features.
The following steps were taken to see how KO might be used to improve the existing background:

Fig.1: Original Snapshot, taken with an Epson PhotoPC 850Z; June 2000.
A comparison of Figures 1 and 2 shows what KO can do. This is most obvious in the changed appearance of the soap dispenser bottle to the model's right. But for this particular photo, the results obtained are only marginally successful. In my limited experience with KO to date, I have found that distracting backgrounds that can be darkened lend themselves to this technique much better than those where lightening effects are used.

Fig.2: Same as Fig.1; after background de-emphasis in KnockOut 2.
Having failed to achieve good results by minimizing the existing background, I next decided to replace it with an outdoor scene. KO users typically would collect and maintain a variety of attractive scenes for such substitutions. Being new to this, and having no such library, I stepped out in my back yard and squeezed off a shot across a patch of lawn, aiming into the sun in order to approximate the same lighting condition as the photo used in Figure 1.
The processing to effect substitution went as follows:
Although results are more appealing this time, the picture still does not look entirely natural, and the effects of initial poor lighting are visible. These problems are not the fault of the KO plug-in, of course.
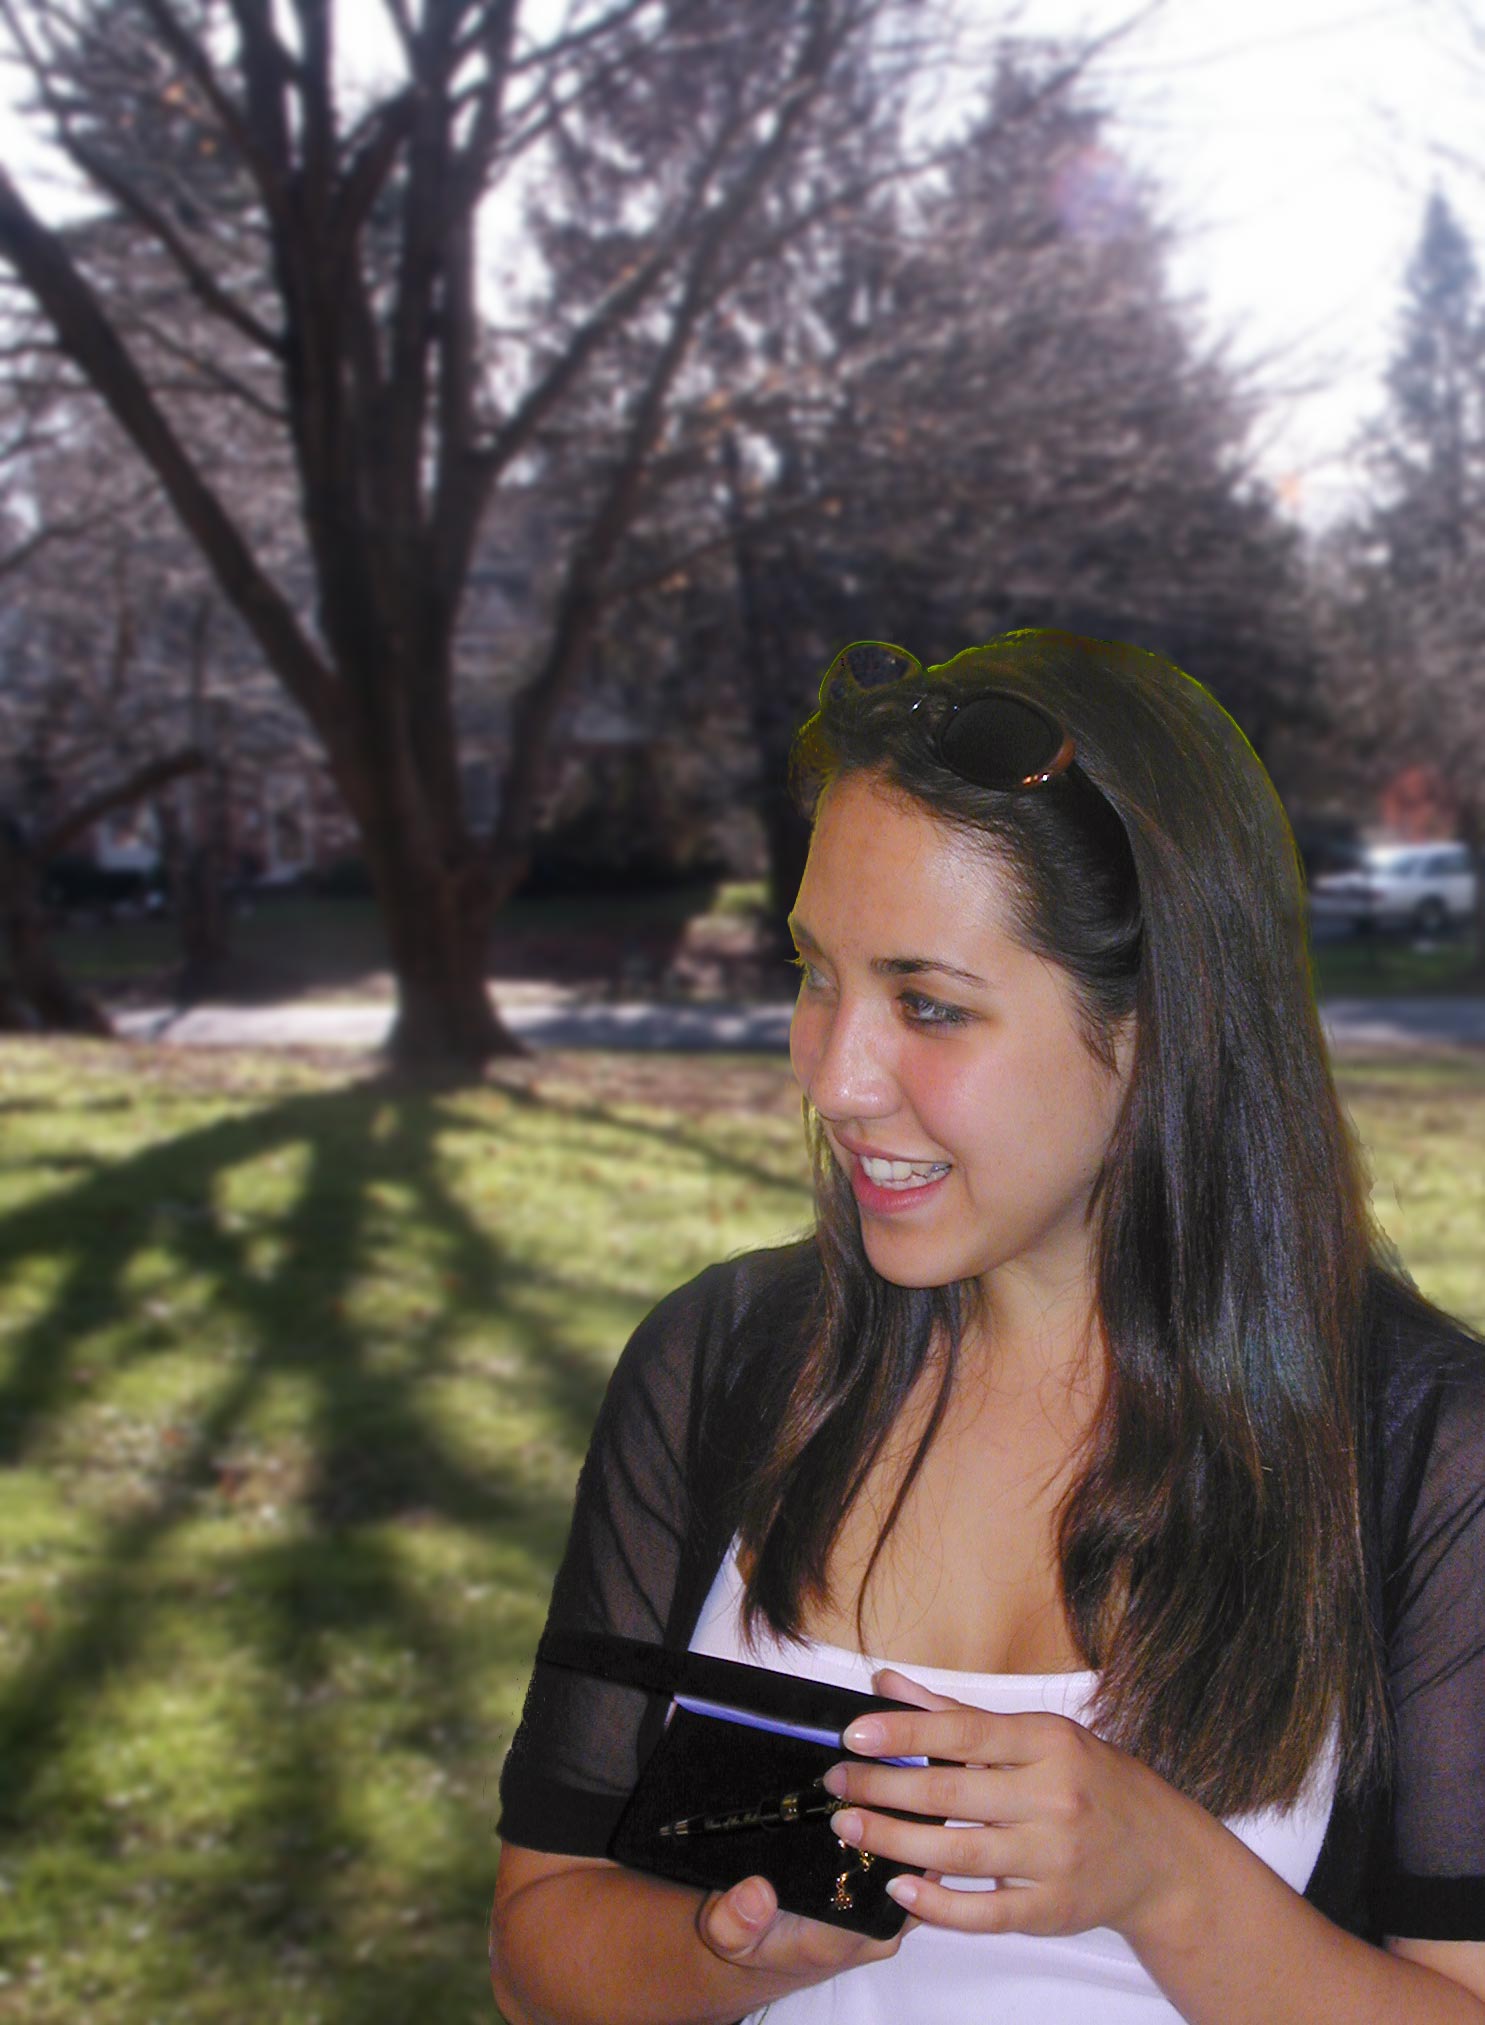
Fig.3: New Background Substituted; photo taken with a Minolta Dimage S304; Dec 2003.
It is not always easy to draw the selection lines that define KO's three areas. In a complex image with many colors, it is appropriate to draw the two lines as close together as possible; otherwise, accuracy in the transition area may be impaired. Using a mouse to draw these lines is rather like trying to use a bar of soap to paint a picture. (Santa has been tasked to come up with a USB drawing tablet before quitting for the year.)
Another issue has to do with lighting. If light striking the knocked out foreground is of a different color temperature than that of a new background, the scene may not have a natural appearance. More importantly, if the light is coming from different directions in the two areas, and shadows fall differently, the effect will be jarring.
Perspective also should be considered. Horizons and
vanishing points may not be visible in the picture,
but they do
nonetheless exist
in both foreground
and background. The viewer will be aware of them, albeit
perhaps subconsciously. The feet of a foreground subject
may appear
to "float" above the
floor in a new background if the camera's height and the angle at which it
is held are not very similar in both shots.
If lenses of different focal length are used for the two shots, the difference in the effects of apparent distance from the viewer may be noticeable also. This is not an issue of perspective, but rather the different amounts of magnification provided by different lenses.
KO excels at one thing: isolation of complex subject areas. Imagine a subject with long, brown hair, blowing in the wind, posed closely in front of an evergreen tree. The green needles and brown trusses are so intermixed in a single layer of the image that manual separation, one from the other, would be virtually impossible. With KO, the entire area in which needles and hair occur together would be included in the user-drawn transition area. The plug-in would then eliminate all of the green background pixels, while leaving all of the brown foreground, and the two areas would be neatly and rapidly separated.
Suppose that the available light is not good, and the camera's flash has illuminated the subject head on. The foreground, too near the camera is over exposed, and the background is under exposed. With KO, the two areas can be isolated one from the other. Brightness and contrast can be separately adjusted in each area.
Finally, consider the situation where multiple, disparate objects are to be included in a single image. With some prior planning, it would be possible to make a number of photographs, perhaps one of each object, and use KO to isolate each on a separate layer. These layers could all be stacked on top of an appropriate background to create the desired montage.
These capabilities are useful for those of us that grab our shots how, when and where we can, sometimes in places that are far from complementary to our subject.