

This article is a continuation of the series about simple programming in REALbasic (RB). The series began as a demonstration of how to build a simple check register. In successive articles I have shown you how to add various functions to this simple register to create a full-featured application. The application through Part 5 can be downloaded here:
http://www.wap.org/journal/realbasic/
In this article, I will show you how to add the following functions:
Throughout this series of articles, I’ve ignored the situation in which the user made an error when entering data into a checkbook record. Once entered, there was no way to make corrections to an individual record. I’ll remedy that shortcoming now. The editing process will be initiated by the user double-clicking on a particular record. That record will be formatted into a string in the same way it would be when saving to a file, and the string is sent to the edit window along with the line number (as a pointer) in TransWindow’s transList.
Rather than introduce a new edit window, I’ll use the existing CheckWindow or DepositWindow that have been a part of the application from the beginning. Throughout this description I will use the example of a check transaction, but both a check edit and a deposit edit will be incorporated into the application.
First, I’ll add three new properties to CheckWindow (DepositWindow will obviously not receive the variable, ckNr):
ckNr as string
linePointer as integer
tempName as string
I’ll also add two boolean properties, DRedit and isCleared, to the G lobalFinancial module.
I’ll add a new method, editInit, that will be called when I want CheckWindow to open in the Edit mode. This method will accept two parameters when it is called:
line as string
lineNr as integer
The property line is the formatted record described above, and lineNr is the line number pointer from TransWindow. This is editInit:
// Takes data field information and initializes window

        dim oldDate As string

        dim oldDebit As Double

        dim i As integer
  iscleared = False

        linePointer = lineNr
  // Parse Line

        oldDate = NthField(line, chr(9), 1)

        ckNr = NthField(line, chr(9), 2)

        if NthField(line, chr(9), 3) = "x" then isCleared = true

        tempName = NthField(line, chr(9), 4)
oldDebit = val(NthField(line, chr(9), 5))
  if ckNr <> "" then cknrField.text ="Check Number "+
      ckNr

        ckDate.text = oldDate

        pay.text = tempName

        ckAmount.text = Format(oldDebit, "#.00")
If you have read most of this series of articles, you should now be able to understand the code in this method. After initialization, the record line is parsed and the fields in CheckWindow are populated.
Next, I’ll make this addition to CheckWindow’s Open event handler to set the window’s title properly:
if isedit then

      me.Title = "Edit Check"

        Else

          me.Title = "Write Check "

        End
Lastly, the following line is added to the CancelButton Open event handler to present the proper button label:
if isEdit Then me.Caption = "Cancel"
In order for this to work, I must add some small code to TransWindow to call the CheckWindow editInit method. I add t he following to transList doubleClick action item:
dim rowNr As integer
  // Record needs to be edited

        isedit = True

        rowNr = me.listIndex

        DRedit = False

        if me.Cell(rowNr, 4) <> "" then DRedit = true // It's
      a check or other debit record

        me.selected(rowNr) = False  // De-select the row

        if DRedit then

          CheckWindow.editInit(sendTransRow(rowNr), rowNr)

        else

          DepositWindow.editInit(sendTransRow(rowNr), rowNr)

        end if
First, some flags are set and then the type of record is determined. Then CheckWindow or DepositWindow editInit is called as appropriate. The line that’s commented, “De-select the row,” simply removes the blue highlight that automatically appears when the user clicks a listbox row.
Now, when the user double-clicks a transaction in the check register , CheckWindow appears with the check data as shown in Figure 1.
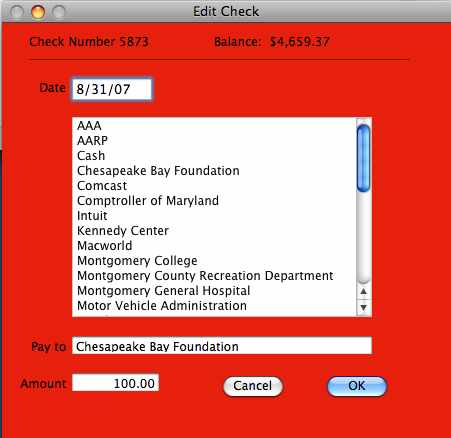
Figure 1 - The Check Window transformed into a Check Edit window.
Once the user has made changes to the record, the OKbutton Action event handler must update the record in the check register. Now that I have two dissimilar events triggered by the OKbutton (check entry and check edit), I have added two new methods, completeTransaction and completeEdit, to manage these events. The modified OKbutton Action event handler now simply does error checking, calls the appropriate event completion method and then resets CheckWindow:
if ckDate.checkEnteredDate = false then return
  If Pay.text = "" then

          msgBox "You must enter a Payee"

          Return

        End if
  If ckamount.text = "" and pay.text <> "void" then

          msgBox "You must enter a Check Amount"

          Return

        End if
  if isedit then

          completeEdit

          Return

        Else

          completeTransaction

        End
  // Reset Check Window

        if manyCheck = false then

          self.close

          return

        end if

        BalText.text = "Balance:  $"+ TransWindow.transList.Cell(ntransactions
      - 1, 6)

        CkNrText.text="Check Number : " + str(nextcknr)

        ckdate.setfocus

        CkDate.SelStart = 0

        CkDate.SelLength = Len(CkDate.text)

        ckamount.text = ""

        pay.text = ""

        PayeeList.scrollposition = 0

        PayeeList.listindex = - 1
Before I proceed, I’m adding a new string property, transDate, and an integer property, checkNr, to G lobalFinancial. The complete Transaction method follows:
dim s As string
  // update variables

        transdate = ckDate.text

        checkNr = nextcknr
  if pay.text="void" then

          iscleared = true

          Debit = 0

        Else

          iscleared = false

          Debit = val(ckamount.text)

        End
  // Build record string

        s = transdate + chr(9)

        s = s + str(checkNr) + chr(9)

        if iscleared then

          s = s + "x" + chr(9)

        Else

          s = s + chr(9)

        End

        s = s + Pay.text + chr(9)

        s = s + str(Debit) + chr(9)
  // Update Check Register window

        transWindow.addTransRow(s, ntransactions)

        ntransactions = ntransactions + 1

        testEntryDate(ntransactions)  //ck date & recompute Balance

        ListHasChanged = True
The complimentary completeEdit method is:
dim s As string
  if pay.text="void" then

          iscleared = true

          Debit = 0

        else

          Debit = val(ckamount.text)

        end if
  // Build record string

        s = ckDate.text + chr(9)

        s = s + ckNr + chr(9)

        if iscleared then

          s = s + "x" + chr(9)

        else

          s = s + chr(9)

        end

        s = s + Pay.text + chr(9)

        s = s + str(Debit) + chr(9)
  // Update Check Register window

        transWindow.addTransRow(s, linePointer)

        testEntryDate(linePointer+1)

        ListHasChanged = True
self.Close
In both of these methods, the “void” case is handled and then a record string is constructed and handed off to transWindow’s addTransRow method to insert the data. This completes the addition of an edit function. As I mentioned earlier, the same modifications are done to DepositWindow to provide the edit function for deposit records.
Instead of editing a record, perhaps you want to delete it altogether. I’ll add a new Edit menu item and the associated code to accomplish this. Figure 2 shows the new menu item; here’s the menu handler for Delete Transaction:
dim i As integer
  i = transList.listindex

        transList.removeRow i

        ntransactions = ntransactions-1
  FindBalance()

        listHasChanged = true
Return True

Figure 2 – New Menu Item – Delete Transaction
In the last article, I covered the editing capabilities for the Payee and Depositor files. But what if you wanted to simply use a new name when writing a check or making a deposit, without going to the trouble of first modifying the appropriate list of names? If you use a new name, the application should be smart enough to recognize it as a new name and query whether you want to add it to the associated list. Here’s how I’ll add that capability.
If you look closely at the editInit method at the beginning of this article, you’ll notice that when the incoming line is parsed, the variable tempName is set to the Name (Payee), and then the edit field pay.text is set to tempName. If the user, while writing a new check or editing an old one, enters a new name into pay.text, it will differ from tempName and a simple test can trigger a query whether or not to add the new name.
If Pay.text <> tempName then queryNewName //new name to be added?
This line, added to the OKbutton Action handler, will call the new queryNewName method. The query should call a new dialog box in which the user can choose whether the new name should be retained. To manage this, I’ll add two new variables to G lobalFinancial, nname as boolean and newName as string .Here is the code for t he new method queryNewName:
dim i As Integer
  nname = false

  newName = pay.text

  AddName.showModal

  If nname = true then

    npayees = npayees+1

    Paylist.append newName

    PayeeList.deleteAllRows

    for i = 1 to npayees

      payeeList.addrow payList(i)

    next

    payeeList.headingindex = 0

    payeeList.sort

    payeesChanged = true

  end if
This method initializes the new variables and calls the new dialog box. If the dialog box returns True the new name is added to the list of Payee names and the list is flagged to be saved. Figure 3 shows the new dialog box, AddName.

Figure 3 – Should this name be added to the list?
This window’s Open event handler must set the correct window title depending on whether the name the user enters is a Payee or a Depositor name.
dim i As Integer
  //set window title

        for i = 0 to WindowCount - 1

          if Window(i).title = "Write Check" then

            self.Title = "Modify Payee List?"

            Exit

          Else

            self.Title = "Modify Depositor List"

          End

        Next
This code steps through the application’s open windows. If the open window is named “Write Check,” the call must have come from that window so the title should be, “Modify Payee List.” O therwise, the call came from the Deposit window, so the title will be "Modify Depositor List."
The name in question, tempName, is shown bold and the tempName Open handler sets itself according to the variable newName:
me.text = newName
The No button merely closes the window, but if the user clicks the OK button, then the program needs to incorporates the new name. The code for this is:
Nname = true

      self.close
As before, similar code is added to the DepositWindow to test for a new name.
As you know, every Macintosh application has an About box, which you access by selecting the About menu item under the application name. S o it seems only right to create one for this application too. First, I add the menu item. As with the Preferences menu item I added in Part 5 of this series, I add the menu item to the Edit menu and then designate it an Apple menu item. The menu handler is a simple:
About.show
The About box itself is a new window that will be constructed with a couple of graphic icons. I’ve placed the two graphic files in the same folder as the application. Figure 4 shows the construction of the About box within a portion of the development environment before the addition of the icons. Within this box I’ve added two canvas controls. If you look at the right side of Figure 4, you’ll see a Backdrop property with a small disclosure triangle. Clicking on that triangle opens a browse menu that allows me to select the icon I want for each canvas control.
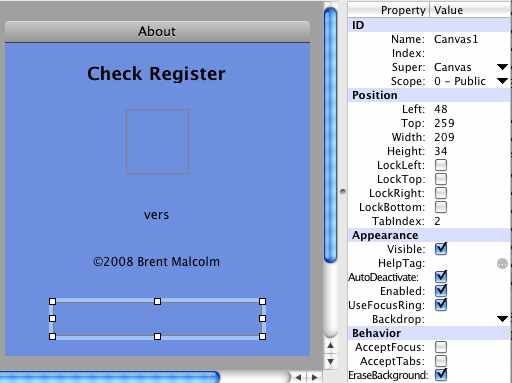
Figure 4 - The About box under construction
In order to display a version number in the box, I’ve programmed the Open handler for the static text reading “vers”:
me.Text = app.ShortVersion
Then in the Project window under Application, I’ve entered the version number in the field for ShortVersion. Finally, I’ve programmed both the KeyDown and MouseDown event handlers to cause the About box to close when either of these events occur :
self.close
The finished About box is shown in Figure 5.
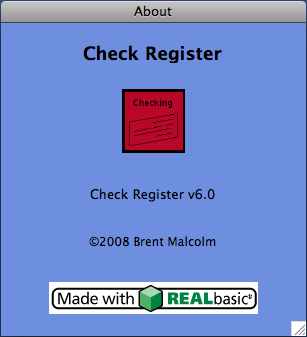
Figure 5 – The completed About box
This concludes this article on REALbasic. In my next article, I will show you how to add an automatic deposit function to your program .
The compiled application to date along with the data files and the source code can be downloaded here:
http://www.wap.org/journal/realbasic/