

Use a Mac for more than a few weeks and you’ll discover it quickly accumulates vast amounts of personal information. It might hold your checkbook, your income tax information, health records, credit card information, warranty information, address books, genealogy records, and countless other bits and pieces of highly personal data. Generally speaking, you want this data handy for your needs – and completely unavailable to anyone else.
The Mac offers a powerful tool for the paranoid in Mac OS X 10.4: FileVault. With just a few clicks and a good password, your computer’s hard drive is encrypted. If someone steals your laptop or, somewhat less likely, your desktop Mac, they won’t be able to recover anything from the hard drive.
Unfortunately, FileVault also has a dark side: if you have problems with your hard drive, FileVault may prevent you from recovering your own data. Since FileVault encrypts the data, and since drive recovery tools can’t break in to FileVault, minor problems with your drive can escalate into major data losses.
If you use a Mac at work, you will probably find your employer prohibits the use of FileVault. Generally speaking, employers consider the computers to be, well, theirs, and don’t appreciate employees encrypting them.
Important disclaimer: the author has nothing against FileVault. FileVault is a wonderful piece of technology, without doubt the best operating system-level encryption tool ever released in a consumer operating system. Most operating systems would kill for a secure storage technology as cool as FileVault. Etc.
But the Mac has another very powerful tool for the paranoid: Disk Utility. Most users know Disk Utility as the magical application that can verify hard drives, repair permissions, format new disk drives, and make copies of CD-ROMs and DVDs. Yet it can do more: Disk Utility can make portable password-protected disk images.
Portable, password-protected disk images have some wonderful advantages. Until you open the image, the disk image is just a file on your hard drive. If someone gains access to your computer, or, worse, steals your computer, the image looks like just a single file. The intruder has no idea what the file might be, and, without the password, they have no way to open it up.
Figure 1: Navigate the nested menus in Disk Utility to select New > Blank Disk Image…
Depending on size, you can E-mail the disk image to yourself, copy it to a CD-ROM or DVD, copy it to a flash drive, or copy it to a file server. If you have a .mac account, you can copy it to an obscure location on your .mac drive, then reach it remotely from almost anywhere in the world.
So how do you make a portable, password-protected disk image?

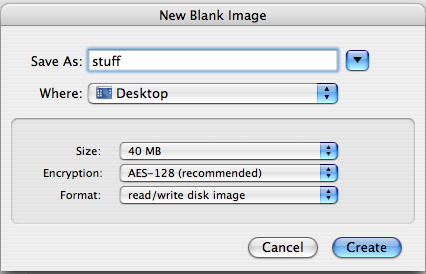
Figure 2: You can name the image something besides “stuff,” you can save it somewhere other than the Desktop, and you can make it almost any size you want. But be sure and select AES-128 Encryption and be sure and make the image read/write.
You should end up with a file called stuff.dmg on your Desktop, and an icon that looks like a floppy disk drive called “stuff” (see Figure 4). If you open up the “stuff” image, you should find you have about 31 megabytes of space for your income tax returns, property records, embarrassing high school photos and other things you’d like to keep, but keep to yourself. When you are done copying things to your “stuff” drive, eject it by dragging it to the trash or right-clicking on it and selecting Eject. You will still have the stuff.dmg file on your desktop.

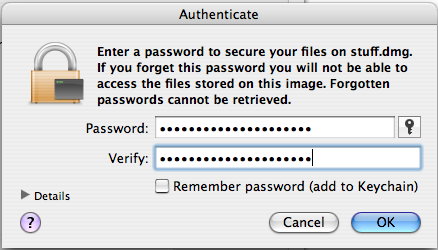
Figure 3: Most people waste much effort trying to come up with memorable short passwords. It is almost always easier to come up with a memorable pass phrase. These might involve more typing, but they are easier to remember – and far more secure as well.
You can now copy this encrypted image wherever you need it. If you want to add more information to it, or access something in it, just double-click on stuff.dmg and you’ll be prompted for the password or pass phrase.
If you find that 40 megabytes isn’t enough, use Disk Utility to create a bigger image. Disk Utility will allow you to create disk images in the multi-terabyte range, though Washington Apple Pi has never been able to verify this capability. (Please contact maceditor@wap.org if you’d like to donate an Xserve RAID to Washington Apple Pi.)
Some suggestions on managing your new, portable encrypted disk image:
The nicest thing about such password-protected images are: they are free. All you need is a Mac and Disk Utility. You don’t have to buy anything extra, you don’t have to add anything to your Mac, you don’t have to use exotic hardware. There is no lengthy manual to read, you don’t need to know a thing about encryption or cryptography or even what AES-128 means.
It may not be as cool as a super-charged Aston-Martin sports car. But if James Bond used a Mac for storing his secrets, he’d stop getting captured by the bad guys: his secrets would be safe. And the gas bills are lower, too.

Figure 4: An encrypted disk image (on the right) doesn’t look any different than any other disk image. But if you don’t know the password, you can’t mount it and use it.