

At the 'Living the iLife' demo, several questions came up about the 'Cherry Blossoms' iMovie demo. Many of you wanted to know how it was done. As it turns out, the process is fairly simple.
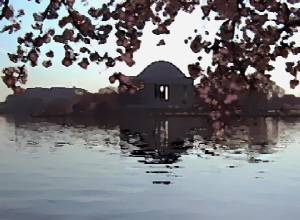
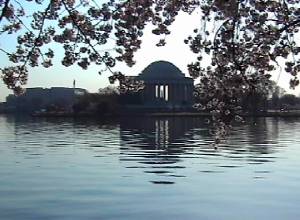
In this example, the video part is composed of only two clips -- one of the cherry blossoms framing the Jefferson Memorial, the second of the Washington Monument reflecting in the Tidal Basin. But the opening and closing sequences morph from what appeared to be a black and white line drawing, to a watercolor, to a still image, then to a video clip, all flowing together seamlessly.
To create that effect, first create a folder on the desktop. This gives you a place where you can save all the images. This makes it easier to keep track, when it's time to import. Then--
1- Select the first clip, first frame: choose Edit>Create still frame.
2- In the same clip, move to the last frame: choose Edit>Create still frame.
3- Repeat the process for the second clip, creating a still frame of the first and last frame of the clip.
4-Open these four clips in Photoshop (or Photoshop Elements).
5-Duplicate the images, and save and close the originals .
6-Now using the dups, open the first frame of the first image; again make two copies.
7-In Photoshop, make the first copy of the first frame into a black and white line drawing; then use the second copy of the first frame to make a watercolor image -- it's a filter in Photoshop. Then repeat the process for the other three frames. You'll wind up with twelves images.
Here's the sequence:
Step one: create three still frames.
File>Save Frame
Open in Photoshop, create two dups: File>Duplicate
Choose first dup:
Enhance>Adjust Color>Remove color (want black and white)
Filter>Blur>Smart Blur
Radius = 3.0
Threshold = 25.0
Quality High
Mode Overlay Edge
Label>Save to Folder
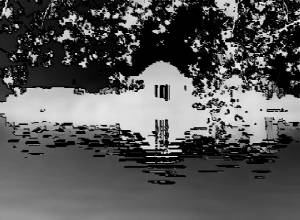
First frame: black and white
Choose the second dup:
Filter>Artistic>Dry Brush
Fiddle' with brush size, detail, texture
If too dark/light, 'fiddle' with Levels.
Label>Save to Folder
First frame, watercolor:
Choose the third dup:
'Fiddle' with Enhance>Lighting>Brightness/Contrast
Label>Save to folder
First frame: still image
8-When you finish, hat you will then have is twelve images, a line drawing of the first frame of the first clip, and a watercolor of the same frame, a still of the first frame, then a line drawing of the last frame of the first clip, and a watercolor of the same frame, and a still of the last frame; and the same with the frames from the last clip.
9-Next, import these clips back into iMovie.
10-Arrange them as follows: line drawing from first frame, watercolor from first frame, first still frame, then the clip; then reverse the order at the end -- clip, last frame, watercolor of last frame, line drawing of last frame.
11-Now simply add a cross dissolve transition between each still frame, adjusting its length to ensure a smooth transition from line drawing to watercolor to still to motion.
12-That's all there is to it!