

Will you need a table of contents for that great book you are going to write? More down to earth, how about an attractive food menu or name and address form?
Those types of chores are done with tabs and they can be darn tricky. I once made an index for a manual and it became so botched up I had to use Whiteout to hide some periods that were text wrapping. Sometimes I could not make tabs work at all.
The AppleWorks Help file is correct but it sure is confusing. So, reaching under my computer desk, I consulted my technical library and then made a number of tests. Finally I got it. A numbered list is the answer. Tabs need to be done in chronological order, 1, 2, 3.
As you know, tapping the Tab key will advance the insertion point, and the text to the right of it, in 1/2 inch increments by default. However, set tab markers and the insertion point and text will go to those new locations.
Open AppleWorks and select the Word Processor. These are the four tabs in the ruler that cause the confusion but can do a great job.
![]()
Left to right they are named the “Left Tab,” “Center Tab,” “Right Tab” and the “Align On Tab.”
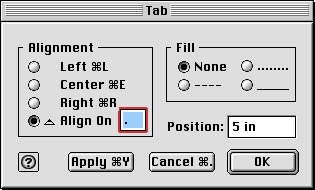
Figure 1
Click on any tab and the Tab Dialog Box will open. You may set tab markers precisely by entering a ruler position in this dialog box. But for most applications, and for this exercise, simply mouse drag the tabs onto the lower bar of the ruler. Drop the Left tab marker at 2” and the Right tab marker at 6”.
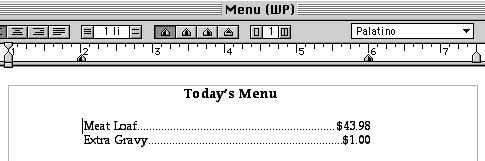
Figure 2
Start with the cursor at the left edge of the page.
1. Tap Tab key. Cursor will move to first tab. Type the word or number.
2. Tap Tab key again, cursor will move to the rightmost location. Type in that word or number.
3. Now to make the dots or dashes, the connecting “leaders.” Double click the Right tab, the one you dragged to the 6” mark, to open a dialog box. See Figure 2.
A. The “Fill” panel in the dialog box is at None by default.
B. Click on your choice of connecting periods, dashes or solid line.
C. Click Apply. You have connected your items.
D. Click OK to close the dialog box.
Press the Return key to make the next line. Repeat steps 1 and 2 but not 3! The connecting dots, called leaders, will remember. You can now make as many rows as you wish. Press Return, repeat step 1, repeat step 2, press Return and keep going. Break this sequence and you may have to start over.
Done. This simplifies, for me, a confusing application. Yes, all this for meat loaf and gravy. I hope it helps.
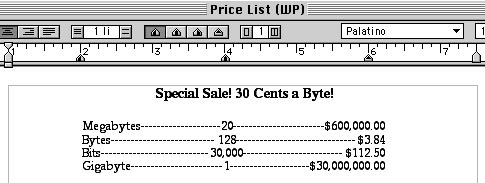
Figure 3
Three tabs used in this nonsense sales order are the "Left," "Center" and "Align On." The layout is very neat with a left and right side alignment and centering in the middle. The leaders, the dashes, were entered both at the “Center” and the “Align On” tabs. The prices are centered on the period separating dollars and cents.
The dashes are entered on the first row only, in both the Center and Align On tabs. As you type additional rows the they will “remember” to automatically connect the items.
The numbering sequence went like this: 1, 2, 3, 2, 3, Return to start the second row, then 1, 2, 2, return, and on...
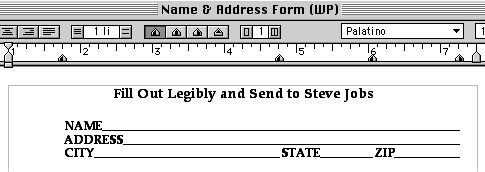
Figure 4
Tabs make a neat name and address form that only takes moments to work up. Set the Left and Right tabs for the first two lines. Here the Left tab was set at 1 1/2 inches and the Right tab at 7 inches. Do not drag tabs to the ruler for “State” and “Zip” before making the third line. That will make extra work and leave a small white gap in the solid lines.
When at step 2 do not type anything on the Right tab in the Name and Address lines. Just click on the solid line in the dialog box’s Fill panel. You might want to press the Return key twice between each row for a double line space to allow extra room for handwriting.
Drag down the “State” and “Zip” tabs before making the third line. Use the Left tab for each and set them at about 4 3/4 and 5 3/4 inch markings on the ruler. You know what to do. At each of these open the dialog box by clicking on that tab marker you just placed on the ruler.
It is great to watch the solid lines fill exactly the right length making a justified form. Don’t you think this is a lot easier and neater than tapping out one hundred and fifty underlines?