

About 25 years ago, a friend was between permanent homes and stored his 200-plus LP records at my house. His collection filled in a lot of blanks in mine, and I decided to convert as many stereo LPs as possible into audiocassette tapes. Over the course of six months, I generated about 80 tapes, each of which was filled with 90 minutes of music. Occasional purchases brought the total collection of rock, soul, classical, country, bluegrass, and other recordings to well over 100 cassettes. I thought I was set for life.
This large collection resulted in my initial resistance to CDs, but after I got my first CD player I found that I preferred the higher sound quality and greater convenience of music on CD. After a while, I was largely ignoring the great albums I had taped.
I’ve been an Apple owner since the days of the Apple IIc, but have never considered myself technologically sophisticated. Not long ago, I moved from a Quadra 610 to a 17-inch, 1GHz iMac with 768 MB of RAM, an 80 GB hard drive, and a SuperDrive that burns both CDs and DVDs. The operating system is Mac OS X 10.2.8. Notwithstanding my fears that I’ll cause a “kernel panic” or other disaster I can’t handle if do anything at all out of the ordinary, the arrival of iTunes 4.2 and purchase of a 200 GB FireWire drive, as well as some success using iPhoto, persuaded me that I should make better use of the iMac’s capabilities.
I hoped that the process of digitizing my audiotapes and converting them to CDs would be easy, but knew that would be unlikely. In a perfect world, I could just hook up my cassette player to a CD burner, similar to the process used to transfer LPs to tape. I also hoped that I could find straightforward instructions (Digitizing for Dummies?) in print and on the Internet. No such luck!
David Pogue’s The Missing Manual X (2d ed.) and The Robin Williams Mac OS X Book weren’t much assistance. The iTunes tutorial on the Apple support site largely is a marketing tool for the Apple Music Store. I found some help on the Washington Apple Pi TCS, as well as discussion forums at Apple Support, MacWorld, MacFixit and MacInTouch, but I mostly got only pieces of a larger puzzle.
More helpful were a series of Google searches. While most of the items were PC and Windows related, I could extrapolate across platforms. I also found that including “Mac” in my search (e.g., “audio tape computer transfer Mac”) would narrow down the articles, even if some were dated. Links to some of the items I found most helpful are included at the end of this article as Resources.
Taking inventory of all the cassette tapes, CDs and LPs I had and deciding what would be a priority for transfer was the next step. The buddy who was the source of the original LPs that I taped also got a say in setting priorities so I could return the favor of 25 years ago and burn CDs for him. It’s tough to say good-bye to old friends, but I knew I wasn’t going to listen to everything. I decided that the tapes and most of the LPs (but not the original Beatles albums!) would be sold or given to charity.
Besides a headphone port, my 17” iMac has a line in port that can be used to import music. Had I not had one, I probably would have purchased a USB input device such as Griffin Technology’s iMic, one benefit of which is the Final Vinyl software that comes with it.
I had learned from my research that I would get the best results from a cassette deck with a line out port or ports that could feed music directly to the iMac. Using the headphone jack from the cassette deck was a possibility, but sound quality and volume are hard to control. Using the leads meant for speakers was out of the question. The voltage needed to drive speakers is sufficiently high to burn out a sound card.
Research is great, but there’s nothing like a helpful neighbor. My stereo system’s Yamaha TC-520 stereo cassette tape deck could easily be moved up to the computer and has line out ports, but disconnecting and moving other parts of the system, particularly the amplifier, was out of the question. I started looking around for a self-contained cassette player and amplifier. Then the retired patent attorney who lives across the street looked at my cassette deck’s power specifications and told me that the line out’s level/impedance of 370 mV/50kΩ was sufficient to drive the music directly into the iMac without additional amplification. I was thrilled.
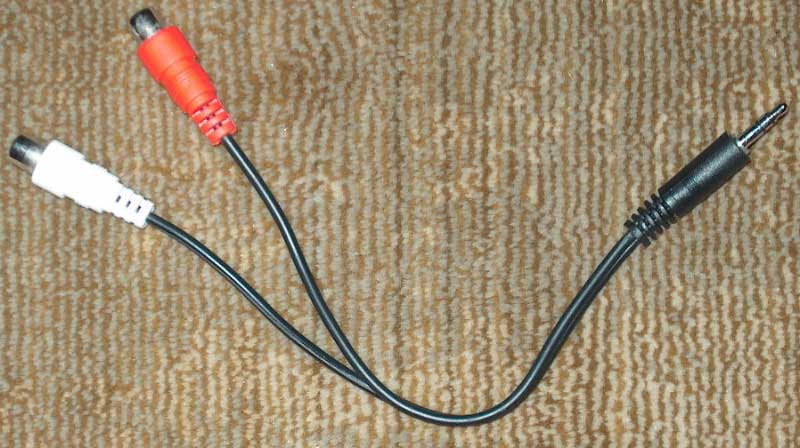
P1. Y-cable used to send left and right stereo signals to the mini-jack. The two plastic rings on the mini-jack indicate it is stereo. (Photo by Mark Davis, taken with an HP Photosmart 812xi digital camera.)
The cassette deck has left and right line-out ports that accept what are called “RCA-type” jacks. I purchased the necessary extension cables and a Y-adapter from Radio Shack. The Y-adapter combines the two signals that comprise the stereo into one jack–in this case with a 3.5 mm plug that fit the iMac’s line-in port. Make sure the jack is, in fact, stereo; you can tell by the two plastic dividers near the tip instead of one. (Picture P1 shows Y-cable and mini jack.)
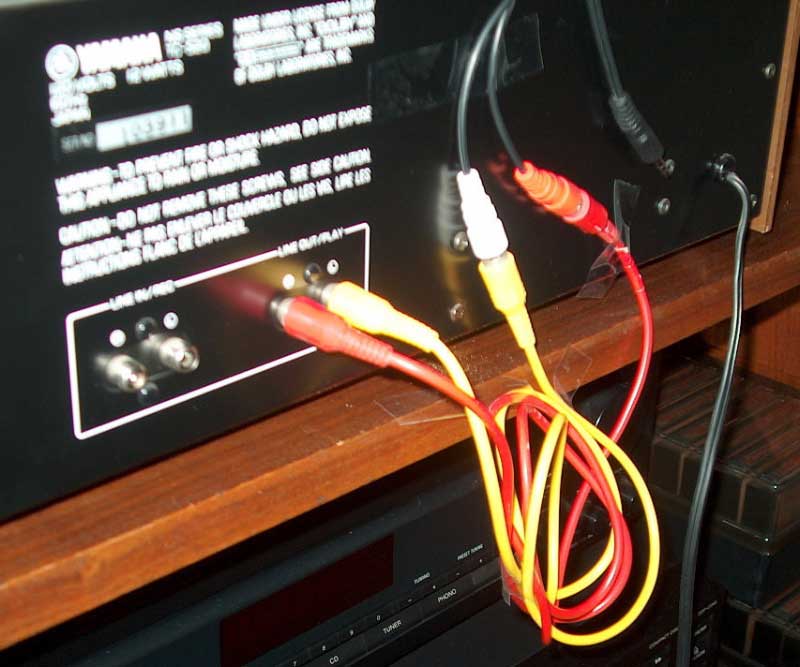
P2. Cables going from the line out connections in back of the cassette deck, through extension cables, to the mini-jack. (Photo by Mark Davis, taken with an HP Photosmart 812xi digital camera.)
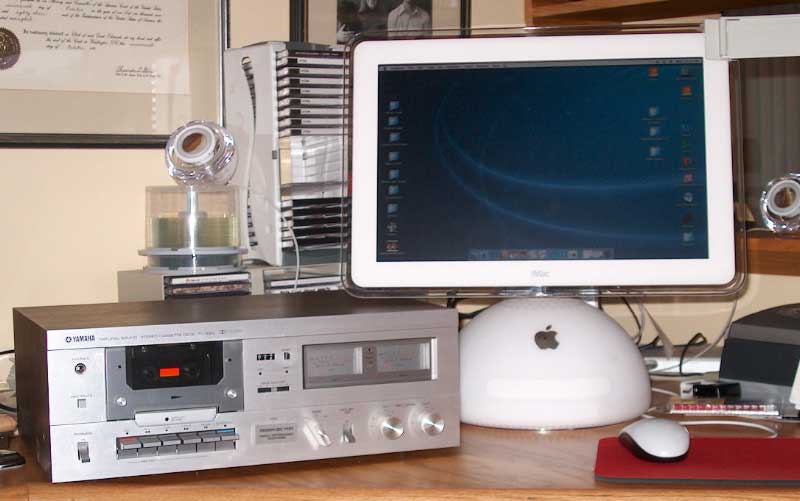
I then plugged the extension cables into the left and right line out ports on the back of the cassette deck, connected them to the Y-adapter, and plugged the mini jack into the iMac. I also purchased some headphones to monitor what the digitizing and recording process. Hardware-wise, I was set. (Picture P2 shows the cables coming out of the back of the cassette deck. Picture P3 shows the cassette deck and iMac from the front. Picture P4 shows the back of the iMac, with cable connections.)
P3. Yamaha TC-520 cassette deck next to the G4 iMac, ready to record. (Photo by Mark Davis, taken with an HP Photosmart 812xi digital camera.)
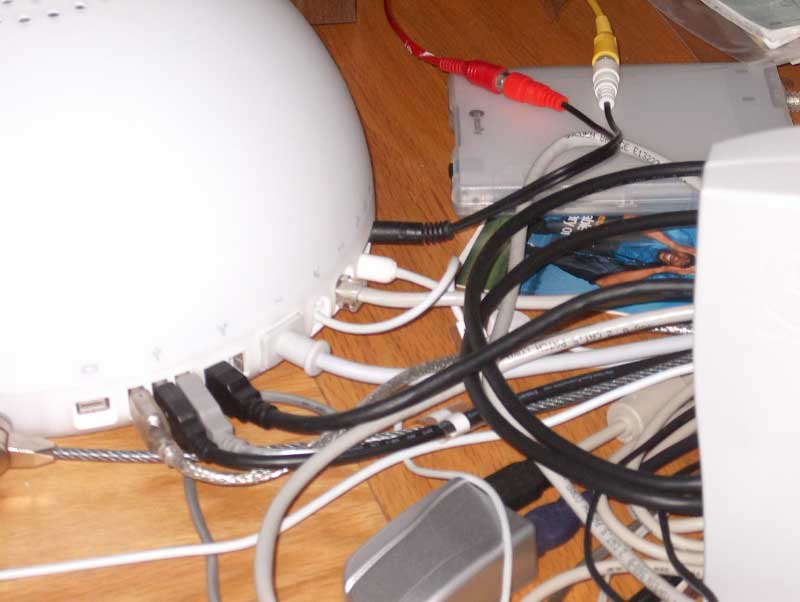
P4. Back of the iMac, showing cable connections. The mini-jack connects to the line in port (also called “audio in port” in Apple documentation) on the far right. (Photo by Mark Davis, taken with an HP Photosmart 812xi digital camera.)
I initially thought that iTunes would provide all the software necessary. I learned from the Apple Computer, Inc. team that demonstrated GarageBand at the January Washington Apple Pi general meeting that iTunes does not include separate software to record and digitize music. They also said that editing software would be useful.
A search for Mac OS X software on VersionTracker, Download.com, Harmony-Central and various discussion boards revealed numerous programs that seemed highly regarded. Among the commercial and shareware of note were Amadeus II (HairerSoft), Sound Studio (Felt Tip Software), Sound Sculptor II (Jeff Smith), Cacophony (Richard Bannister), Peak (Bias), Jasmine (Kumulipo) and Logic Audio (emagic).
At first I considered Audio Recorder 1.4 (Ben Shanfelder), straightforward, recording-only freeware, but decided it would be nice be able to manipulate some of the music, especially to edit out clicks and scratches that had carried over from the LPs. This led me to Audacity (SourceForge). Not only is it freeware, but it is open source software for Mac OS X, Linux and Windows. The features are impressive and extensive documentation is available. I installed it.
There are several ways to set up Mac OS X for recording. After opening the Sound Panel in System Preferences , clicking on the “Input” tab will let you set the volume and designate “line in” as the source for sound.
Another resource is the program included in Mac OS X for controlling the Musical Instrument Digital Interface (MIDI). In the Applications > Utilities folder, open Audio MIDI Setup. Clicking on the “Audio Devices” tab again permits control of the sound volume. Importantly, checking “Play Through” will permit you to listen to what is being recorded by the computer with either the external speakers or headphones. (Screen Shot SS1 shows Sound Preference Panel and Audio Midi Setup)
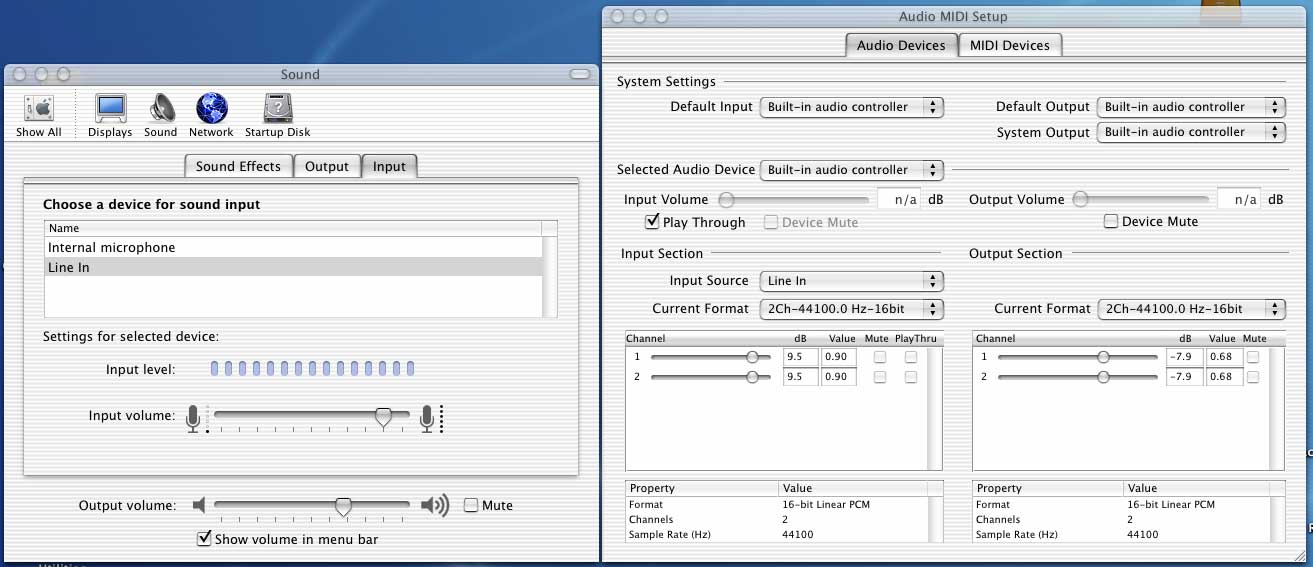
SS1. The MAC OS X Sound Preference Panel and Audio MIDI Setup screens.
The most useful resource for controlling the computer is one I wasn’t even looking for. When checking out editing programs, I came across BetterSound, a free audio Preference Panel (Alain Cretet Software). In addition to being able to designate the volume levels and input device, a VU meter facilitates monitoring the stereo input to assure sound is not being lost because volume is set too low or too high. I also was impressed by the instructions and support provided by the author.
As mentioned, Audacity has extensive documentation. I mostly stuck with the program’s default preferences, but some settings are particularly important.
Audio I/O: Recording should be set for “2 channels (stereo)” and both the playback and recording devices set at “Built in audio controller.”
Quality: Audio CDs sample sound 44,100 times per second (“sample rate” of 44 KHz). The standard sample format (number of digits in the digital representation of each sample) is 16-bit. Audacity’s defaults are a 44 KHz sample rate, but 32-bit sample format. I used these defaults for recording even though I knew burning would be at the CD standard because 32- bit sampling was better for editing.
File Formats: I set Audacity for the faster “Read directly from the original file” rather than the safer “Make a copy of the file before editing.” I set Uncompressed Export Format as “AIFF” (Audio Interchange File Format, used by Apple) .
Interface: I turned off “Autoscroll while playing.” Audacity allows viewing of recording progress in periods of time of fractions of a second to multiple minutes. I found it best to zoom out to a longer time period to view recording progress. I opted to always allow pausing. Audacity can show the sound as waves or color spectrograms. I kept “update the spectrogram while playing,” enabled the edit and mixer toolbars, and enabled dragging of the left and right selection edges. With slower computer chips or limited RAM, some of these settings might have to be de-selected (especially spectrogram-related). Shutting down other programs also helps.
Before recording, it is important to test the sound level. VU meters, including the one in BetterSound, show the decibel level with green (okay) and red or orange (in danger of sound being lost). The level should be mostly in the high ranges of green, flickering into the red/orange only occasionally.
Starting Audacity opens the recording page. Before recording, select “New project” from the File menu, then give it a name. An initial decision is whether each song on an album will be a separate track, as is the case with most CDs. For cassettes, that means stopping the tape and Audacity after each song, saving the results, and beginning a new project for the next song. Since saving each song separately is tedious and I am mainly interested in preserving albums, I decided to make each track consist of an entire side of an album.
Transferring music from a cassette to computer takes place in real time. A 45-minute side of a tape takes 45 minutes to transfer. For each cassette, determine where the music actually starts (or where you want to start recording). Having a counter on the cassette deck helps the process. Next, click on Audacity’s Record button, and then start playing the tape. If there is too much empty time at the beginning or end of the Audacity recording, it can be easily deleted using the Edit function. At the end of the segment of tape being recorded, stop the cassette, click on Audacity’s Stop button, and save the project.
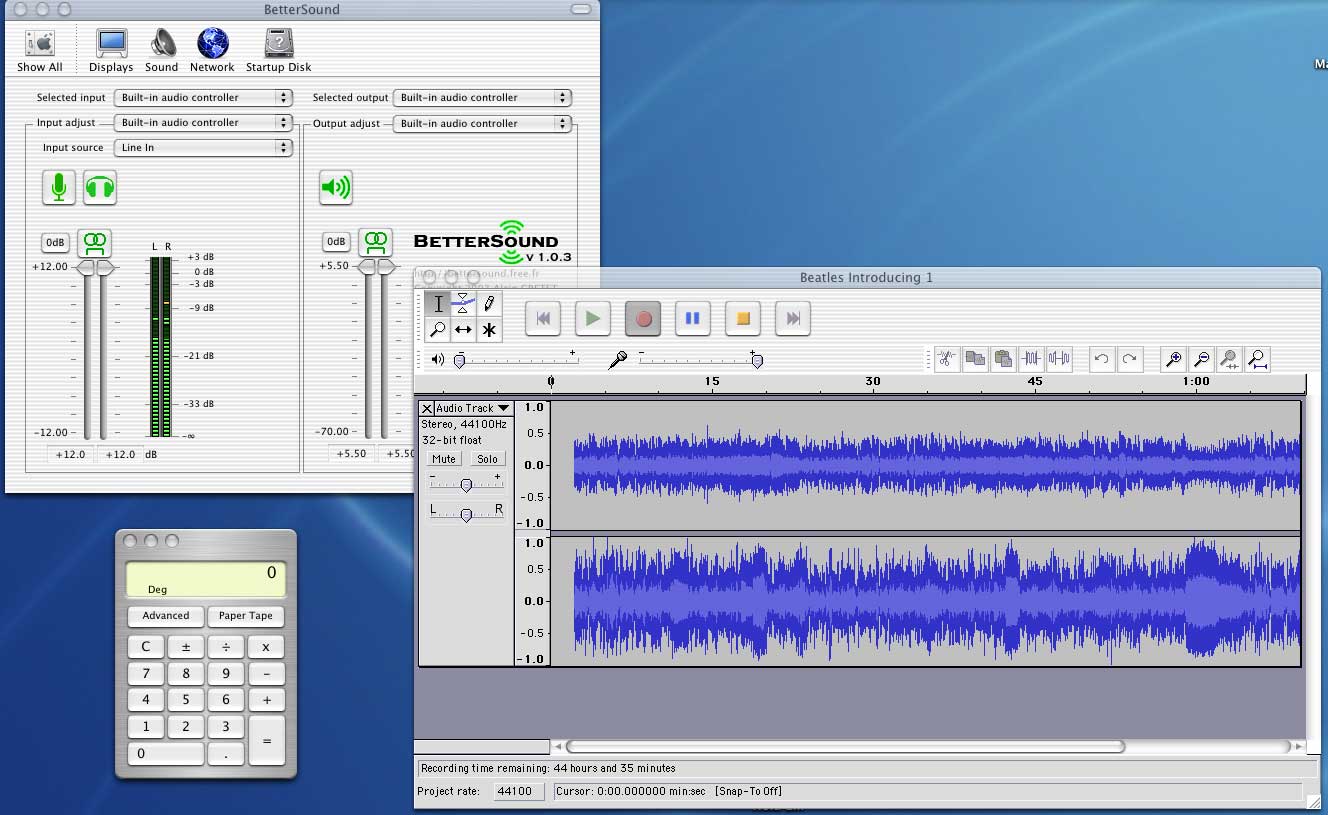
SS2. The recording set up. The BetterSound panel, upper left, shows the active vumeter. Audacity is in the midst of recording side 1 of Introducing the Beatles. The recording control buttons are at the top. The calculator is kept handing to add up the time of recordings.
CDs hold about 70 minutes of music, as opposed to 90 minutes for many two-sided cassette tapes. A watch and calculator are handy for keeping track of the total time elapsed for recordings. (Screen Shot SS2 shows the BetterSound panel, the Audacity recording page, and the calculator.)
Audacity saves music in a its own compression format that uses the .aup suffix. While newer CD players will play MP3 files, older models are limited primarily to the WAV (used by Microsoft and IBM platforms) and AIFF formats. Since I didn’t want to go out and buy new equipment, I decided to use AIFF.
Having set Audacity to export in uncompressed AIFF format, I was able to select “Export as AIFF” from the File menu. Each export took 1 to 3 minutes to convert from Audacity .aup files to AIFF format. While I may have been able to export directly to iTunes, I decided to create a temporary holding folder on the Desktop for the exported AIFF files. Uncompressed music takes up a lot of drive space. For example, an album consisting of two compressed .aup files totaling 176 KB translated to 577 MB in uncompressed AIFF files.
As with many Apple programs, iTunes has a good help function. Moving the AIFF files into iTunes proved simple: drag the files to the iTunes icon and drop them. Album sides took up to three minutes to transfer. Each file, or track, appears as a “song” in the right side of the main iTunes window, along with its length in time. By selecting “Get Info” from the File menu, details can be added about each item, including the artist, album, and genre.
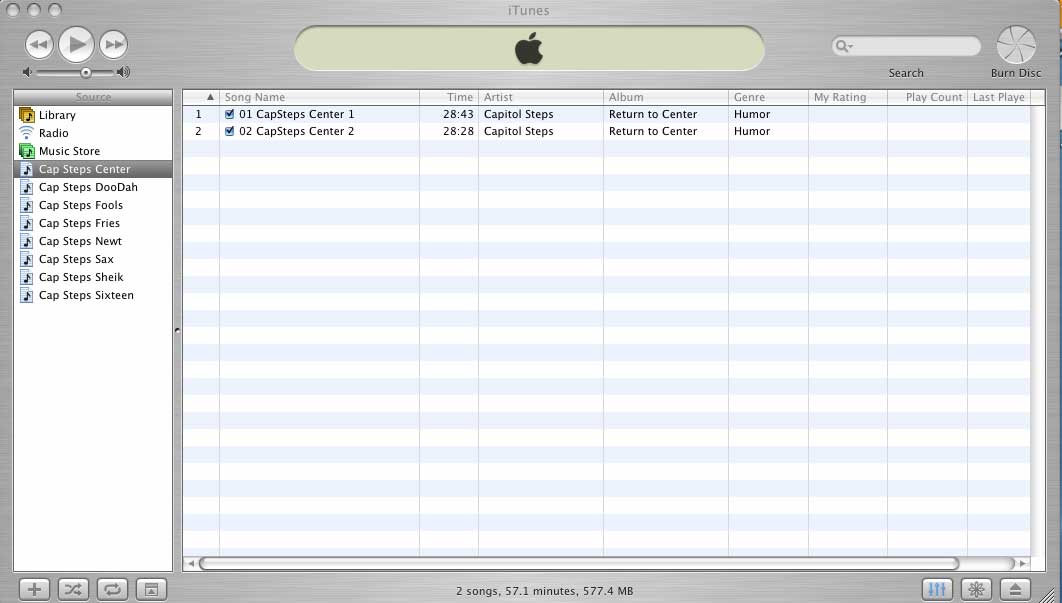
SS3. The iTunes main page, showing playlists in the left column and song information to the right. After a blank CD is inserted, dragging one or more playlists to the round “Burn Disc”icon” and selecting “Burn Disc” from the File menu creates a CD. (Note that what are listed under songs are actually entire album sides.)
The left side of the main window is primarily for “playlists.” These are groups of songs to be kept together for playing or burning. After a new playlist is created, songs are added by dragging them to a playlist. When I first opened iTunes, I generally stuck with the default preference settings, though I specified “AIFF Encoder” for the “Import Using” preference, and “Audio CD” as the disc format for burning. (Screen Shot SS3 is shows the main iTunes page.)
Once an album was successfully transferred to iTunes, I deleted the AIFF file from the temporary desktop folder in order to save drive space. However, a large AIFF file remains in the iTunes music folder. To preserve space (and later make use of an iPod), once I have burned the desired CDs, I plan to use iTunes to convert the music to compressed MP3 files for permanent storage. Converting leaves both file types in the iTunes music file, so the AIFF will have to be deleted to restore drive space.
Burning a CD also is relatively easy. Note that only CD-R discs should be used for music, since CD players generally can’t play CD-RWs. Inserting a blank CD-R into the appropriate drive (the built in SuperDrive in the case of the iMac) brings up a dialog asking what you want to do. Selecting “Open iTunes” brings up the main window. Selecting “Burn Playlist to Disc” from the File menu turns what had been a “Browse” icon at the top right into a “Burn Disc” icon. Drag a playlist totaling less than the disc’s capacity to the icon, then click on the icon (or again select “Burn Playlist” from the File menu), and the icon turns into an orange and black spinning beach ball. In a few minutes, depending on the size of the playlist and speed of your CD burner, the CD shows up on the desktop with the playlist’s title.
The final step-and one that I took with great trepidation-was to see if the burned CD really worked in a player other than the iMac. I tested my first effort both in the my stereo system and car CD player. It worked! My reaction was “mirabile dictu!” For those not familiar with the Latin expression, this essentially refers to an event that is so miraculous that even speaking of it is wonderful.
Better Sound
http://bettersound.free.fr/
Audacity
http://audacity.sourceforge.net
Apple audio downloads
http://www.apple.com/downloads/macosx/audio/index1.html
“Turn Your LPs or Cassettes into CDs,” MacWorld, May 2002 by Jonathan
Seff
http://www.macworld.com/2002/05/bc/31analog/
“Mac Mac OS X audio recording and editing software” by Al Fasoldt
http://aroundcny.com/technofile/texts/mac061803.html
“Burning CDs from LPs and Tapes by Alan Zisman”
http://zisman.ca/Recording/printer_Mac.html
“Using iTunes and Amadeus to Create MP3s from Cassette Audio Tapes”
http://www.mrs.umn.edu/ITI/2003/itunesMP3cassettes.html
“Copy Vinyl or Tape Recordings to CDR”
http://www.gmayor.com/copy_vinyl_to_CDR.htm
“How to Connect"
http://jos.nijmegen.internl.net/HowToConnect.htm
“Converting Tapes and Audio to CD”
http://www.blazeaudio.com/howto/lp-overview.html
Mark Davis, an attorney for an association of state officials, is a Washington Apple Pi member.