How Popeye Gets His Spinach |
 |
|
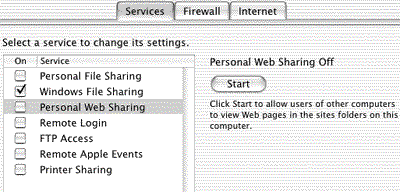
Websharing |
To test it out, open your browser and type the URL http://127.0.0.1/ and press your enter key. You'll see a generic page that you'll want to replace right away. For now, let's do something simple. Open up BBedit (or your favorite plain text editor) and type out an HTML document. Save it as index.html.
<html><head><title>Sheri's Spinach Factory</title></head>
<body bgcolor="#FFFFFF">
<h1>You gotta eat your spinach, baby! </h1>
</body>
</html>
You can type anything you like between the </h1> and </body> tags. We're going to place this file in the Library/Webserver/Documents folder. (You may want to save the default index page and all of the translations of the page in various languages to a backup folder.) Now when you type in http://127.0.0.1/ you'll see your new page.
We are now going to type in the Terminal, and directly alter the Apache configuration file. If you think this sounds dangerous, it is. Still, you have a backup configuration file that you can use to replace the working one if you make any egregious errors. (If you would like to verify the location of the configuration file as well as its backup, you can use "Sherlock" with the invisible file option selected to take a look. Just type "httpd.conf" without the quotes.) If you have hopelessly destroyed the original (one way to tell is that the Web server no longer starts up), use the cp command to copy and rename a file all at once. Type as follows:
cp httpd.conf.bak httpd.conf
What this will do is give you two identical files, the original uncorrupted backup file, and the returned-to-pristine httpd.conf file.
PHP is a scripting language that provides, among other things, the "middleware" that connects the "frontend" (the user's browser) to the "backend" (the database). As one example, suppose you have a contact page for a business on your Web site. The actual contact information resides in a database on the server. The browser may offer a page with a search field to allow users to look up a contact based on specified criteria. When the user enters a name or job function, the PHP scripts are what connect the search to the database and return the information to the browser. PHP is a server-side scripting language as opposed to a client-side or browser interpreted scripting language such as JavaScript. Your scripts are hidden from the user, and only HTML is returned to the browser. Best of all, your code is not dependent upon the browser flavor and version of the user.
Mac OS X comes with PHP already installed. We do have to enable the scripting language in the Apache configuration file, however. This file is called httpd.conf., and is located in a hidden folder inside the path:
/etc/httpd/httpd.conf
Go into your Applications folder and open the Utilities folder. Find and launch the Terminal. You will be presented with a prompt that includes your user name. Type the following command exactly as you see it here:
sudo pico /etc/httpd/httpd.conf
|
|
|
Terminal to the rescue |
Let's break down the meaning of what you have just typed. Sudo stands for "Substitute User Do" and gives you the power of the "Super User" of the computer. Believe it or not, this is not you. (Warning! Fail to treat the Super User with the respect it demands, and you can totally mess up the Mac OS X.) Next you typed Pico to call forth one of the UNIX text editors. You are going to use it to edit the Apache configuration file, the path to which we are pointing in the last part of the command. Press the return key, and you will be asked for the administrative password. Enter it, and then you will find yourself transported to Pico.
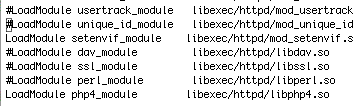
Now we are going to use some of Pico's commands to move around the httpd. conf file. We use the control key with various letters to carry out commands. Let's start with the control and "w" keys. These will bring up a search field. We want to find the LoadModule and AddModule for PHP in the config file. In the black search area, type LoadModule. Hit return and you will be taken to where the LoadModule section of the configuration file begins. Press your down arrow key a couple of times to progress down to the LoadModule list. You will see all kinds of modules, most of which will have the # character next to them. This means they are commented out, or disabled. To enable a module you must remove the # character. Keep pressing your down arrow key till you get to the end of the LoadModule list. You should see the following module for php:
#LoadModule php4_module libexec/httpd/libphp4.so
Use your left arrow key till you are over the # sign. Use the control and d keys to delete it.
|
|
|
Editing the configuration |
After you do this, press your arrow key a few times more till you see the AddModule list. Again, in Jaguar you need to key down till you get to the end of the list. You will see the AddModule for php. Again, remove the # character:
#AddModule mod_php4.c
(Note: For those of you who have earlier versions of Mac OS X, be aware that the Load and Add modules for php do not exist in the httpd.config file. You're the Super User now, right? Go ahead and add them yourselves. Add the LoadModule and AddModule to the end of each respective list exactly as you see them listed in the above paragraphs.)
Let's save what we just did. To save, we "write out" the file, or choose the control and "O" (letter) keys. You will be presented the name of the file to write out (the httpd.conf file.) Press enter to save your work.
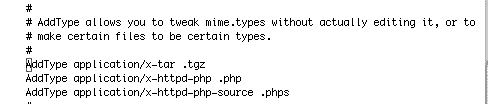
There's one last thing to do, and then you can test that you successfully enabled PHP. We have to add the MIME type. So go ahead and use your control and "w" keys again. Type in "AddType application" without the quotes and press enter. You should now see the line that says "AddType application/x-tar .tgz" Under that line type in the following two lines: AddType application/x-httpd-php .php and AddType application/x-httpd-php-source .phps
(Note: If you are using earlier versions of Mac OSX, these lines will already be there. You will just need to take off the comment mark.)
|
|
|
Add a MIME type |
Now you're ready to "write out" or save the configuration file again. After you save it, exit the configuration file by choosing the control and "x" keys. Once you exit Pico, you will then need to exit Terminal. Type "exit," then close the Terminal window. You also need to go into the "Sharing" panel and stop and restart your Web server so that the new settings apply.
Now we have reached the moment you were waiting for. Let's check to see that we have successfully enabled PHP by creating a little test PHP page. Go into a text editor (BBedit is good) and type the following lines:
<HTML><HEAD><TITLE>PHP Test</TITLE></HEAD>
<BODY>
<?
phpinfo()
?>
</BODY>
</HTML>
Now save this as test.php. Drop it in the root directory of your Web server (Library>Webserver>Documents) Open your browser and type this URL:
http://127.0.0.1/test.php
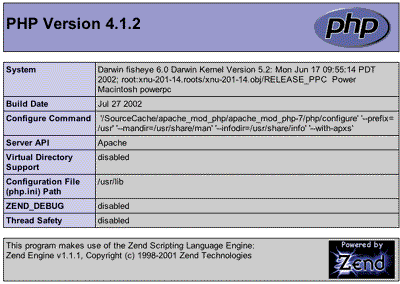
If everything went smoothly, you should see a page with all kinds of information about PHP Version 4.1.2.
|
|
|
PHP Info |
Ready for the next step? Let's install mySQL. Go to the following Web site:
http://www.entropy.ch/software/macosx/mysql/
to download the appropriate version of mySQL for your version of Mac OSX. Note that there are two sets of directions! One is exclusively for Jaguar, and the other is for earlier versions of Mac OS X. You need to create your own mySQL user in earlier versions of the OS, but there is a default mySQL user already installed in Jaguar.
This tutorial assumes that you have never installed mySQL before. If you do have an earlier version on your computer that you wish to remove, you need to very carefully follow Marc Liyanage's directions for cleaning up. For those of you installing for the first time, here are the steps as listed on Marc Liyanage's amazing Web site. Type accurately, and check for typos before pressing the return key between each command.
1. Download the package mysql-3.23.51-jaguar.pkg.tar.gz to your desktop. Unpack it and then double-click on the .pkg file to install it. Open a terminal window and type in the following commands (without the double quotes):2. type "cd /usr/local/mysql"
3. type "sudo ./scripts/mysql_install_db", enter administrator password when asked
4. type "sudo chown -R mysql /usr/local/mysql/*"
5. type "sudo ./bin/safe_mysqld --user=mysql &"
6. Use it with "/usr/local/bin/mysql test"
7. If you do not want to have to type "/usr/local/bin" in front of every command, you have to add the /usr/local/bin directory to your PATH environment variable in your login script. For the default tcsh shell, you can do this by running this command once: "echo 'setenv PATH /usr/local/bin:$PATH' >> ~/.tcshrc"
8. After performing the above steps, read section 4.3 of the manual carefully, it explains how to set up permissions etc.
9. Important: You should at least run this command in order to secure the open master account in the default installation: mysqladmin -u root password new_password_here
Note that you actually type the word "password" and then the password of your choice. Marc also provides an automatic mySQL startup script you can put in the start up items folder of the main "Library" folder so that the mySQL server starts whenever you boot your computer.
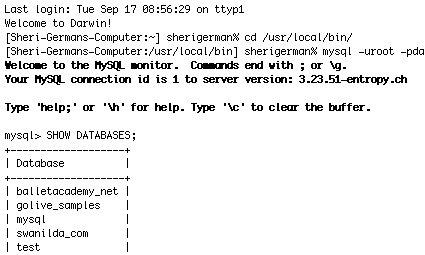
We have some choices for interacting with mySQL. Of course, there is the Terminal for typing directly into the mySQL monitor. To access it, let's first "cd" (change directories) at the prompt to get into the mySQL directory: cd /usr/local/bin/. Next we need to gain entry to the mySQL monitor: mysql &endash;uroot &endash;p[your_password_here] After pressing enter, the mySQL monitor welcome screen appears. At the prompt (mysql>) type SHOW DATABASES; (Don't forget the semi-colon after each command.) After pressing enter, a list of the databases on the mySQL server pops up.
|
|
|
mySQL monitor |
Finally, we are going to install a GUI for mySQL. Why push our luck with the terminal, eh? Go to http://phpmyadmin.sourceforge.net/ and download the latest release of phpMyAdmin. Unpack phpMyAdmin and place the folder in your Web server's document root (Library>Webserver>Documents.) Let's look at the following directions from documentation.txt:
Open the file config.inc.php3 in your favorite editor and change the values for host, user, password and authentication mode to fit your environment. Also insert the correct value for$cfgPmaAbsoluteUri.
So let's launch TextEdit, navigate to the phpMyAdmin folder, and open the config.inc.php file to see where we add the URI, user name, and password. Scroll down just a little bit into the file. It won't be long before you will see something like what is at the bottom line in this screen shot. Where you see the variable $cfgPmaAbsoluteUri, you will see a null value with just single quotes: ' '. Add the value for your computer and phpMyAdmin version.
|
|
|
Configuring phpMyAdmin |
Take note of the URL, because you will access myPhpAdmin with it from within your browser. For instance, I type in http://127.0.0.1/phpMyAdmin-2.3.0/index.php. (I add index.php.) to access the default start page of the program.) You may want to bookmark the page the first time you find it successfully.
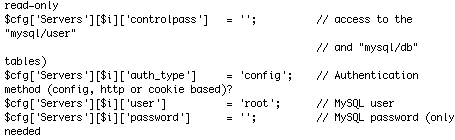
Now let's add your user name and password. Remember that the user will be the administrator of the machine, but the password of the mySQL user! So you will probably enter "root" as the user, and the password you entered when you set up mySQL in the terminal. (You did set up a password for your mySQL user, didn't you?) Scroll down till you see the variables for the user name and password. Enter them between the single quotes. Let's look at a screen shot:
|
|
|
Setting user name and password |
That's it! You have all the pieces in place to now start creating "Web applications." You may be saying, "OK, I am all dressed up in my Super Spinach costume, but I have no place to go." Using this new power may be the subject of future articles. If you can't wait, check out the URLs below:
And once you learn how to do this stuff, you may never sleep, or find time to eat, either. It's definitely more fun than eating your spinach, baby.