|
||||||||||||||||||||||||||||||||||
|
|
|
|
Shiny Shiny, Shiny Boots of Leather: |
|
|
|
|
I am an artist/graphic designer who uses Adobe Photoshop at least 40 hours a week. At least that's what I check when asked on the surveys Adobe includes with the product registration. I've been using the program since its first iteration ten years ago and--all hype aside--this is an impressive upgrade.
To create imagery for print, multimedia and web, Photoshop has been my tool of choice for years. As a matter of fact, it's probably the only tool an illustrator/designer like myself absolutely must have. Photoshop is the industry-standard image-editing, photo-retouching paint program. It has powerful easy-to-use tools for editing pixels, selections, vector paths and type.
I am very pleased with the new version of Photoshop. If you are considering upgrading, let me recommend doing so now. Unless you can't afford it, there's no reason to wait. If you've never used Photoshop and need an all-purpose paint program that you'll never outgrow, this is it. Like most full featured applications, Photoshop wants lots of RAM, disk space and a fast computer but, you're going to need that stuff anyway if you plan to enjoy the process of digital designing.
|
|
|
|
The Document Window: |
|
|
|
|
Photoshop has a comprehensive set of tools for selecting, drawing, painting, coloring, distorting, filtering and doing just about anything you can imagine to a static digital image document. Photoshop doesn't natively work with time-based media such as video or animation but there are plug-in filters (such as KPT) that do. Photoshop ships with its companion program Image Ready which is primarily used for editing and optimizing graphics for the web. The work area in Photoshop and Image Ready consist of a toolbox, the image document window (you can open many images simultaneously) and palettes displaying tool and document settings and options. One of Photoshop's best features is that it allows you to be extremely precise when you work. Whether you are making 1 pixel image adjustments or CMYK color corrections, there's never any guesswork.
|
|
The Layers Palette: Layers can be nested into folders called Sets which can be previewed, moved and blended as one. Layer Styles have their own popmenu icon at the bottom of the palette and--once used--are visible in a collapsible stack underneath the layer to which they are applied. They can be toggled on or off within the layer palette by simply clicking on their eyeball icon in the preview column. Shape layers appear as a solid color layer with a Layer Clipping Path. You can't double-click a layer name to change it anymore. You must CONTROL-Click it and select "Layer Options" in the popmenu. Other improvements include: Type layers update their name better when you make changes to their content. You can toggle "Preserve Transparency" by hitting COMMAND-/. You can also lock layer image data independent of its mask or clipping path, lock its position or all of its attributes. Little icons at the top of the palette allow you to toggle these settings. There are new Adjustment Layers for Fills and Gradient Map. |
|
|
|
|
|
A native Photoshop document (a .psd file) can contain layers, channels, guides, paths and other document information such as annotations, snapshots, copyright or file optimization settings.
Layers help you organize your design by keeping elements of an image discrete. Layers can be edited or moved independently of one-another, simplifying the process of editing and composing. There are several types of layers: normal (paint), shape, type and adjustment. Normal paint layers are ones on which you can paint or draw. Shape layers hold vector paths. Type layers hold individual blocks of text and are editable at any time. Adjustment layers apply common image adjustment commands to other layers underneath it. Layers have different blending modes which control the way they display and can create interesting special effects.
Channels store information about an image's color, selections and layer visibility. A grayscale image has at least one black channel, an RGB has at least 3 (Red, Green, Blue) and a CMYK has at least 4 (Cyan, Magenta, Yellow and Black). Extra channels can be added to a document for printing Spot Colors (like PMS Colors). Extra non-printing channels are called Alpha Channels. For other programs, they can be used to designate special information such as transparent and opaque parts of a flattened image.
Paths are resolution-independent vector shapes that can be used for drawing, selecting and clipping the background from a layer or image. Photoshop has a basic set of tools for drawing, editing and manipulating paths. An image can have lots of paths saved with it. As opposed to normal paint layers, paths increase a file's size negligibly. A path designated as a Clipping Path can also be saved with a flattened file to denote the threshold within an image up to where the background may be rendered transparent similar to an Alpha Channel.
Many programs have a closely matched counterpart--for example: Illustrator or Freehand, Quark or InDesign, Dreamweaver or GoLive--but in 10 years there hasn't been an application that matches the breadth of capabilities offered by Photoshop. Other programs such as X-Res, LivePicture and Painter have unsuccessfully attempted to dethrone Photoshop with their unlimited undos, ability to manipulate large files and simulated natural-media brushes. Adobe addressed the limited undo problem in Photoshop 5 with the History palette. History records each edit or operation performed on a document as a state. From History it's possible revert or duplicate the entire document, as well as "paint" with a previous state. Third-party plug-ins are available that allow Photoshop to work with large high-resolution files better than it does natively. There are even plug-ins that provide Photoshop with natural media brushes like Corel's software Painter.
When you finish designing your image in Photoshop, you usually save a copy of the .psd file in the appropriate flattened format or--if it's intended to be images for a web page--jump to Image Ready to slice and optimize a group of images and create the HTML that uses them. Flattening merges the layers and deletes extraneous document data that other programs don't understand. Photoshop can open and save almost any image format. What it doesn't do natively is probably addressed by a plug-in. If you are designing for the web, Photoshop and Image Ready have sophisticated tools for slicing and optimizing JPEG, GIF and PNG images. Image Ready can create sophisticated* table-based page layouts, Javascript rollovers and GIF animation.
* Although you might think you could build a website by using just Photoshop and Image Ready, don't count on it. Either program will create webpages that can be viewed in most popular browsers without any problem. Unfortunately, they may not generate the most efficient HTML which will be a pain to edit by hand. They have options to conform their HTML and Javascript to the code preferred by GoLive which can be extremely helpful if you use that program but if you prefer to build your pages by hand, you may only use the auto-generated HTML as a guide.
|
|
|
|
The Tool Options Bar: |
|
|
|
|
There are so many new things in Photoshop that to write about them all would entail my regurgitating the entire manual--that's a thought I don't relish! Instead, I'll concentrate on some of the obvious features and try to tell you matter-of-factly what they do and how they might be useful to you.
Photoshop work area has been improved in a number of ways. The Options palette is now a horizontal toolbar that adapts to the size of your monitor similar to the kind you'd expect to find in Microsoft Word or PowerPoint. At first, I was a little suspicious of this. I have two monitors and keep my document workspace and all the palettes over in the other. After a while, I've found the Options bar to be handy--even in a two monitor situation--but especially when there's only one monitor.
The layer palette now lets you organize layers into folders called Layer Sets which allows several individual layers to be reordered, repositioned or dragged into a new document in one move. You can even change the blending mode of a Layer Set.
|
|
|
|
Layer Style: |
The old layer effects are now called layer styles and new ones have been added such as Stroke and Satin. As a matter of fact, all the layer styles have been improved with new parameters and features. Some of the layer styles like Gradient and Pattern Overlay as well as the on-canvas type handling and image slicing are actually not completely new--Image Ready has had them for at least a year but they are welcome in Photoshop. At this point, it seems you only need Image Ready for web page rollovers and animated GIFs, but I'll come to that shortly.
Layer Styles can be combined and saved as Styles (also borrowed from Image Ready). Styles can be dragged and dropped on layers much easier than the old way of copy-and-pasting Layer Styles, patterns, gradients and vector shapes have improved preset management and are more easily edited and shared like Illustrator's brushes and patterns. Expect to see people swapping styles sets. Once you get the hang of using the new layer styles, you have a whole new range of dynamic non-destructive editing you can do.
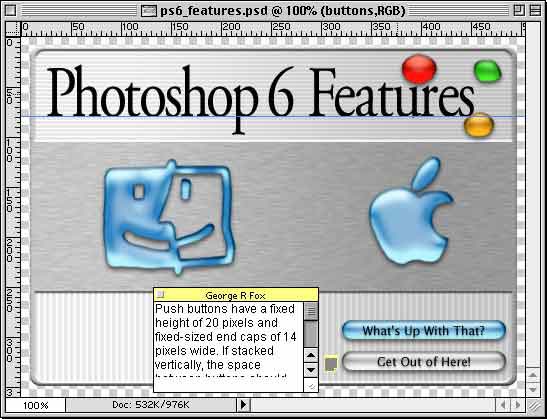
The sample document illustration shows several layer styles in action. One style creates the 3D gooey liquid appearance as seen in the logos and buttons. Another simulates the Quicktime Player-like brushed aluminum interface. Even the subtly shaded striped boxes are just flat shapes with a style applied to them.
The type tool now does paragraphs and text boxes much the way Illustrator does, but you can't link text areas so they overflow from one to another. I don't know why you would do that, but you can't. You can now make each letter a different color and apply any of a number of preset warps to the whole text layer. It's not quite text-on-a-path, which would be pretty useful, but similar to any number of Illustrator plug-ins that distort vector shapes. Each warp preset has a few adjustable parameters, and of course the type stays editable, but they don't offer a lot of precision editing. You can also convert the type to outlines--which creates a vector shape layer. It isn't editable text anymore, but you can apply other transformation commands such as Distort or Perspective.
|
|
|
|
The Toolbar: |
|
|
|
|
I recently created the same high resolution illustration in Photoshop 5.5 and 6. All the layers except one in the Photoshop 6 version were shape layers with various styles applied to them. In Photoshop 5.5, each layer had to be a regular pixel-paint layer. The Photoshop 5.5 version was almost 100 MBs while the Photoshop 6 version was 11 MBs!
A new command called Liquefy acts a bit like Squizz or KPT Goo and gives a you a special set of paint tools to warp and distort an image. You can superimpose a grid-like mesh on top of the image which helps display the amount of distortion when it isn't obvious from the artwork that's being affected.
There's also a new adjustment layer called Gradient Map which maps a gradient around an image's brightness much like the Gradient Mapburst apply mode of KPT 3 Gradient tool.
Adobe has shifted the positions for several of the tools and changed some of the shortcuts! I couldn't get used to Undo (COMMAND-Z) being changed to COMMAND-OPTION-Z. It can be changed back in the preferences. Somehow they have managed to cram more tools into the toolbar including a couple for annotating files (like the way you can with PDFs). You can even attach audio annotations to a Photoshop file. The "Save A Copy" command is now just a option in the "Save As" dialog box.
Some nice interface/feedback improvements Adobe has introduced in the latest versions of these programs include the way Photoshop dims area to be cut away when using the Crop tool. Switching between Photoshop and Image Ready causes the inactive canvas to dim and either program automatically updates the document with any changes made (rather than prompting you to go back and save changes). Just clicking back and forth between the document windows will save changes and update the active version.
|
|
|
|
The Crop Tool: |
|
|
|
|
You can now have Photoshop or Image Ready automatically slice your artwork based on layers rather than drawing them by hand. And some other cool things you can do if you have GoLive 5 (Adobe offers it for an extra $99 to Photoshop users) include:
Using Photoshop images as Smart Objects--Like the publish and subscribe functions employed in most DTP programs, a smart object automatically updates HTML code within GoLive if you make changes in Photoshop. GoLive tracks the file source and optimization destinations.
Importing the layers as HTML--GoLive 5 has the same Save-For-Web optimization engine as Photoshop and Image Ready and allows each layer to have its own optimization settings. This is particularly useful if you plan to use DHTML to animate layer elements.
Even in the best programs--such as these--there are issues I'd like to improve. There are a few interface discrepancies between the two programs such as the fact that the toolbars have different tools. I know certain tools have more relevance in one program over the other but I would rather a preference setting to pick which tools appeared in the toolbar. Other things include: Image Ready can only apply gradients as a Layer Style. Image Ready also sports a lack of path editing support. This wouldn't be a really big deal except that I created a layer with a clipping path in Photoshop and the layer did not display properly in Image Ready. The only way I could find to fix it was to convert the clipping path to a layer mask.
I've also noticed that on several occasions when I opened older files created in Photoshop 5.5 strange things happened. First, Photoshop 6 advised me that some of the type layers would need to be updated. Then, the canvas would appear blank as if the computer froze. Resizing the window had no effect. The only way to remedy the problem was to select the type layer(s) as if I wanted to edit them. This appeared to force the screen to redraw and the problem went away.
If you design artwork with clipping paths that needs to be imported to Quark Xpress, be sure to keep a copy of Photoshop 5.5 (or whatever you have) installed on your computer for the time being. There is a bug in Quark which prevents it from reading embedded clipping paths in TIFF files created by Photoshop 6. If you need to make TIFFs with clipping paths (which worked fine when created with Photoshop 5.5) you'll need to open and re-save them from Photoshop 5.5 in order to make the embedded path readable in Quark. Maybe by the time this is published, a patch will be available.
Working with web designs that involve multiple slices--each with rollover settings--can be confusing. I had a document I was using to create a homepage for a website. Every time I tried to create a new slice one of the layers would turn off and one of the Layer Styles' settings would change. I had created some sample rollovers earlier but deleted them. I deleted all the slices and had to go through each problem layer and "Match Settings Across All Rollovers". I was working fast and may not have paid as close attention as I should when I created the artwork, but it was frustrating how my design kept changing every time I added a slice even when there were no rollovers at the time.
The new layer sets are a great feature but it would be even better if you could nest sets within sets. I could imagine a situation where I had a set that made up a logo and it would be used inside another set that was a webpage header and another document with a set that might have a footer.
Finally, I'd like to see the filters apply dynamically--like the Layer Styles or Adjustment Layers. Illustrator 9 does this already to some extent. I remember how cool LivePicture was because I could apply Gaussian Blur to an image as an effect layer. The layer remained editable at any stage. I don't know whether it's even possible with Photoshop's plug-in architecture, but that kind of functionality would be great.
If you are upgrading, you'll find it's not much fun to install because you have to insert your previous Photoshop installer disc and enter your serial number to even run the new installer application. I've suffered through far worse installations--like most pro-audio software--if you're fortunate, you'll only have to go through it once. One computer where I installed Photoshop 6 warned me when I launched the program that the color profiles were incorrect "…possibly due to installing Illustrator after installing Photoshop. Please Re-install Photoshop again." Remember: never throw away your old disks. Keep them somewhere safe!
Once you get it running, you'll be glad you have it. Photoshop is a fantastic program and once you know how to use all of its tools, commands and options you will probably be able to visualize anything you can imagine. Image Ready too has matured into a powerful application with many useful features. It's a testament to quality of Adobe's software designers that as deep and complex as Photoshop can be, most of the basic functionary and tools are fairly intuitive: easy to find and easy to use. But as advanced a designer as you may be, you may never need another paint program again--until Photoshop 7 ships!
Text and images © 2000, George Fox.
George Fox is an artist and one of the founding partners of F2 Systems in Alexandria, VA.